← back
Contents
Web Browser
General
Main Settings
Email Settings
Quotation & Orders
Integrations
Leads
Calendar
Files
Deals
Others
Mobile
Target
Leads
Appointments
Tasks
Deals
Settings
Contents
Web Browser
General
Main Settings
Email Settings
Quotation & Orders
Integrations
Leads
Calendar
Files
Deals
Others
Mobile
Target
Leads
Appointments
Tasks
Deals
Settings
QuickDesk Sales User Guide
Web Browser
General
Deals Management
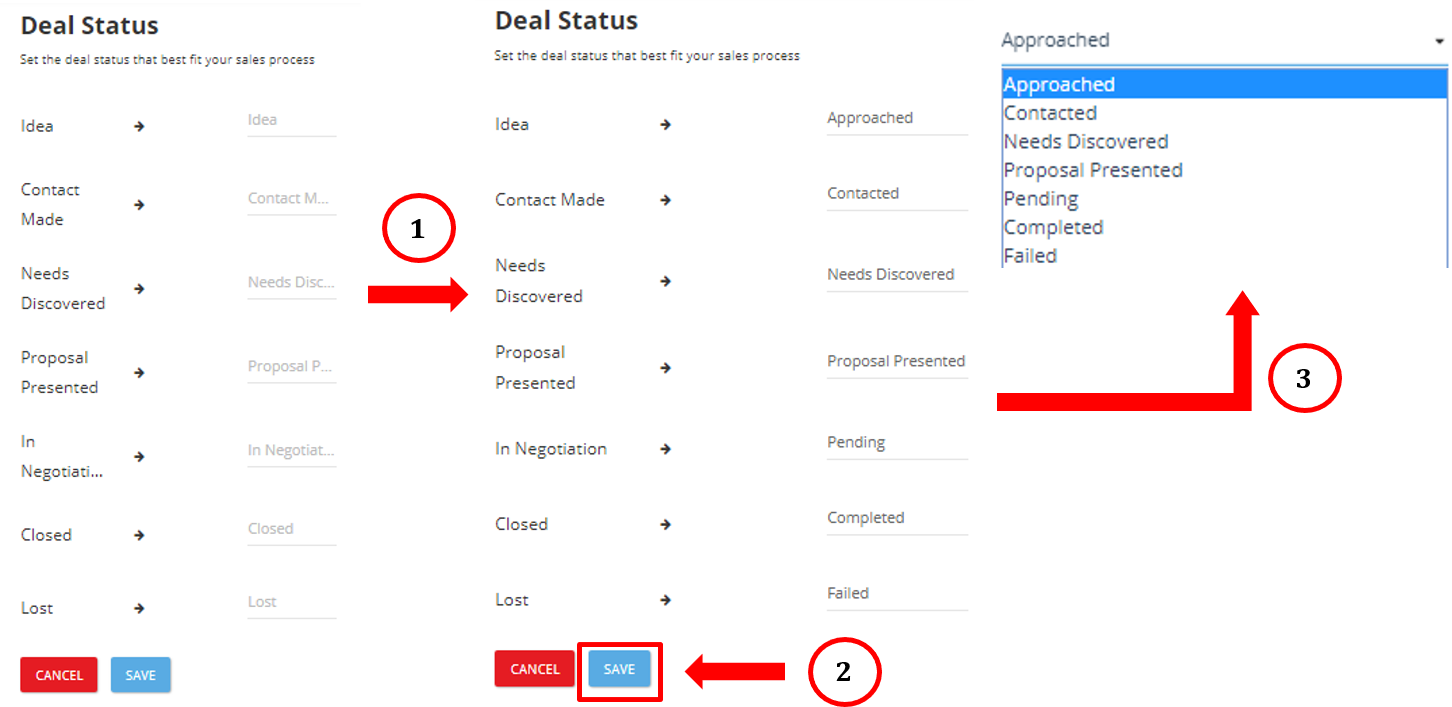
To access the Deals Management settings, click Account Tab → Settings → General → Deals Management. Using this function, users would be able to manage deal statuses, by customising labels to best fit a user’s current sales process and workflow.click to expand section
Account Tab → Settings → General → Deals Management
To customize the labels for the different deal statuses, click on the edit button and make the relevant changes for each of the available options. Afterward, click save to save those changes. The updated labels for the different deal statuses should be reflected in the deals tab once it has been confirmed.
Leads Management
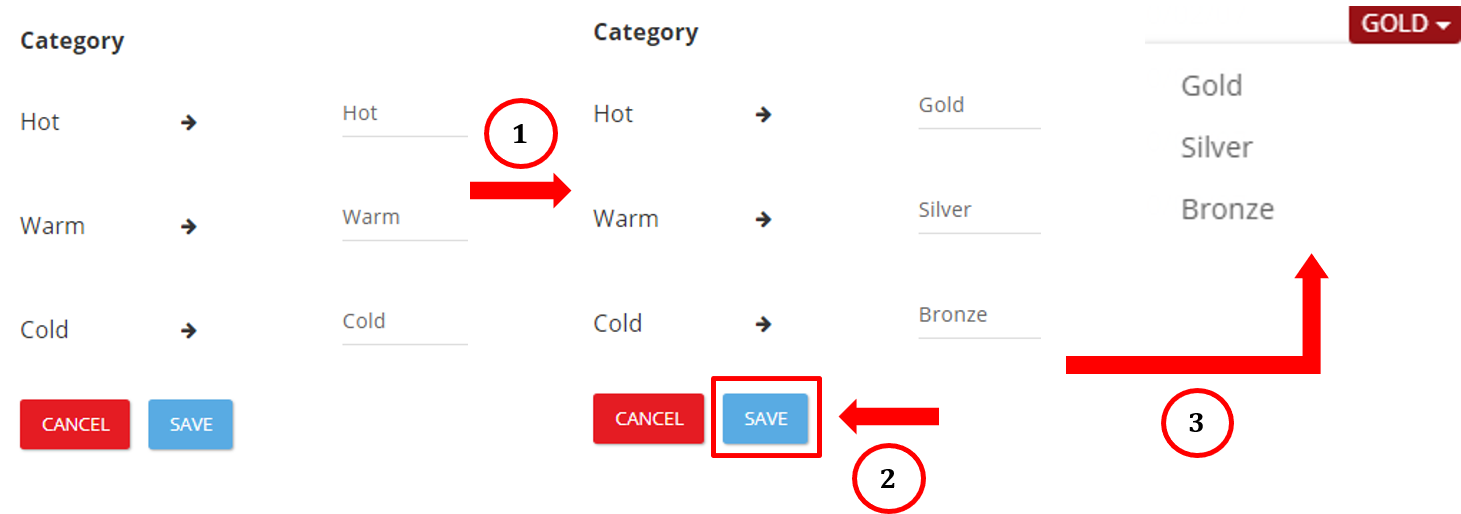
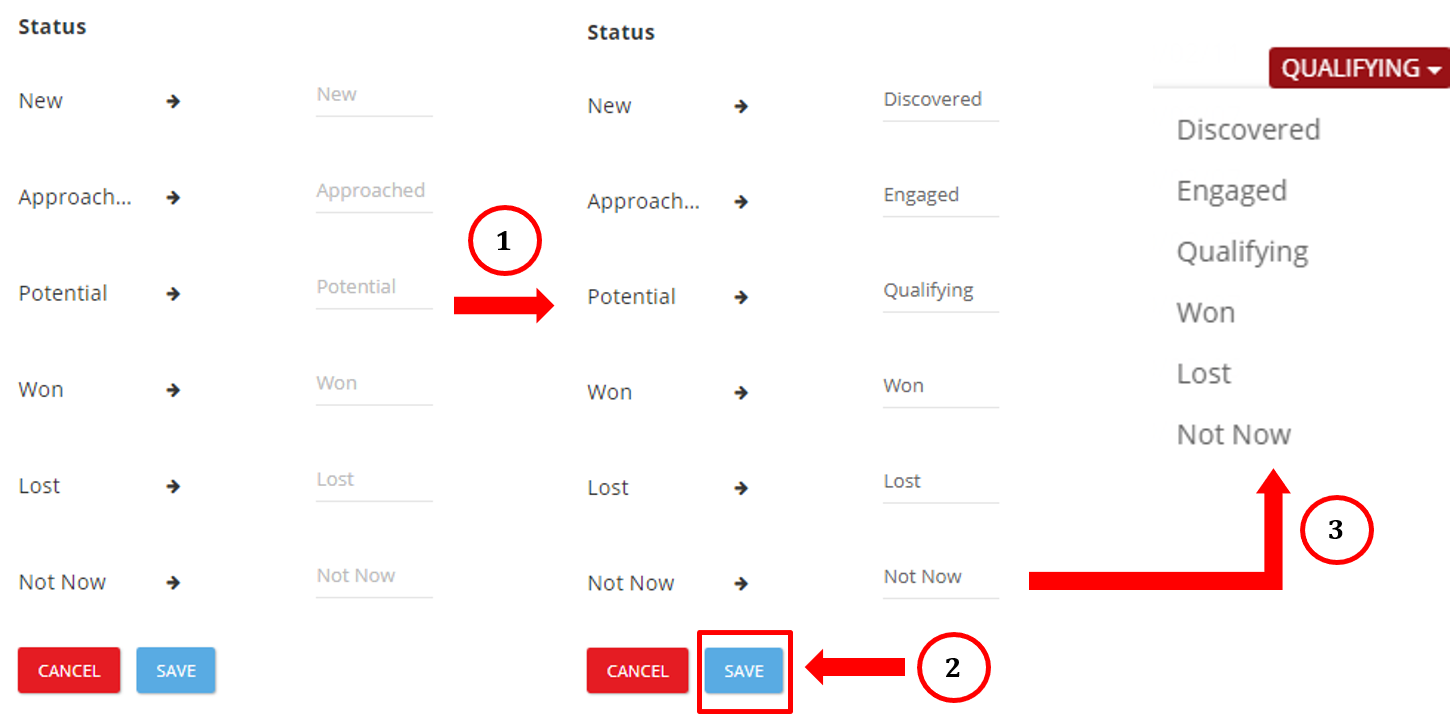
To access the Leads Management settings, click Account Tab → Settings → General → Leads Management. Using this function, users would be able to manage lead categories and statuses, by customizing labels to best fit a user’s current sales process and workflow. Users can also clean up all leads by deleting all records of contacts on the platform.click to expand section
To customize the labels for the different lead categories and statuses, click on the edit button and make the relevant changes for each of the available options. Afterward, click save to save those changes. The updated labels for the different deal statuses should be reflected in the leads tab once it has been confirmed.
To delete all leads from the platform, click the red DELETE ALL button under “Leads Clean-up”. User will be prompted to confirm this irreversible action by typing “DELETE” in the provided text field and clicking “CONFIRM”
Duplicate Management
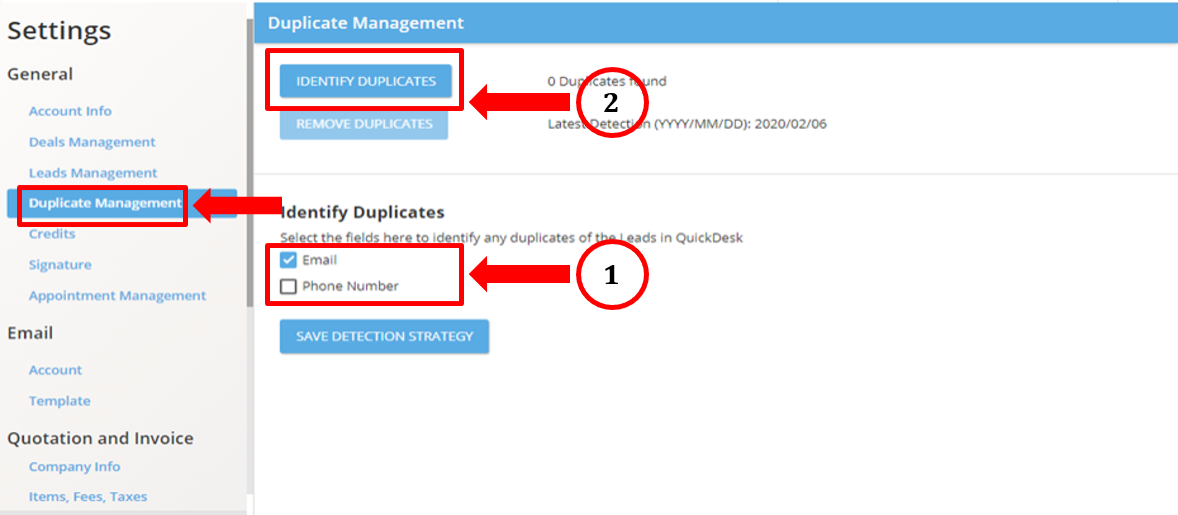
To access the Duplicate Management settings, click Account Tab → Settings → General → Duplicate Management. Using this function, users would be able to identify and remove any duplicate records on the QuickDesk platform and thereby prevent unnecessary clutter of repeated records.click to expand section
Firstly, to identify any duplicate records present on the platform, the user would have to select the relevant fields to be compared and identified. Afterward, click the “IDENTIFY DUPLICATES” button to begin the search.
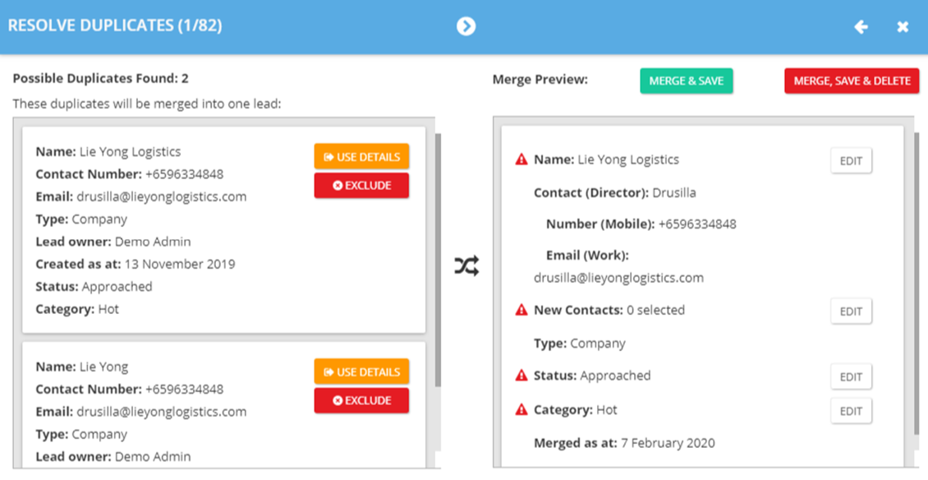
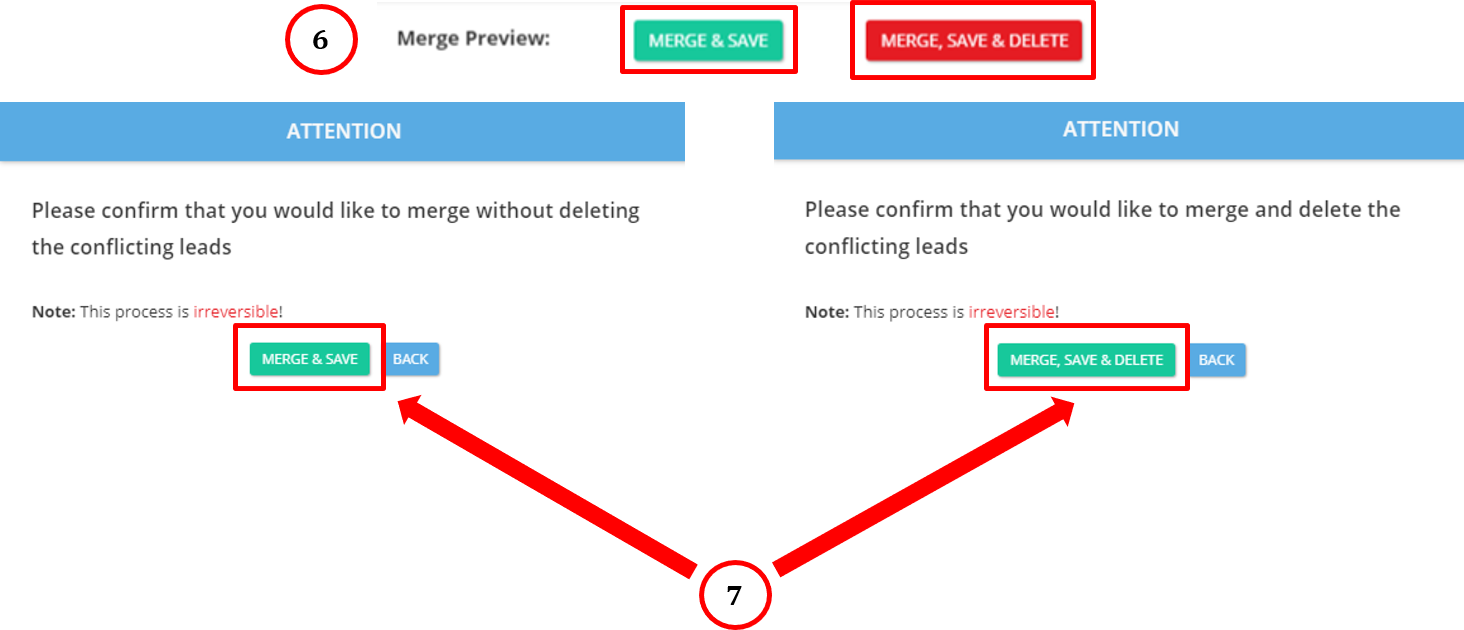
Users will be presented with a notification screen since duplicate identification might take some time to complete. Once identification has been complete, click “REMOVE DUPLICATES” followed by “RESOLVE ALL” to resolve all conflicts.

The duplicates found will be compared with one another, and the user would have the ability to review the differences and decide whether to merge the contacts and delete the duplicate record. Both processes are irreversible and the merged contact would replace the original contact and if the user chooses to delete the conflicting leads, those leads would be removed from the records entirely.
Appointment Management
To access the Appointment Management settings, click Account Tab → Settings → General → Appointment Management. Using this function, users would be able to add new appointment types to better segment and label their sales process. Users would also be able to delete or customise these appointment types to best fit their process.click to expand section
To add a new appointment type, click the “ADD” button on the top right. Afterwards, user can enter in the specified text fields the name and description of this new appointment type. Clicking save would then save these changes, and the updated labels would then be reflected in the appointments tab. To delete appointment types, simply select the record and click the “DELETE” button on the top right.


Main Settings
Account Information
To access the Account Information settings, click Account Tab → Settings → General → Account Information. Using this function, users would be check and edit their QuickDesk Sales account information.click to expand section
The user’s account information will be displayed. To change the name of the account, click “EDIT NAME” and in the given text field, make the specified changes, and click “SAVE” to record these changes.

Credit
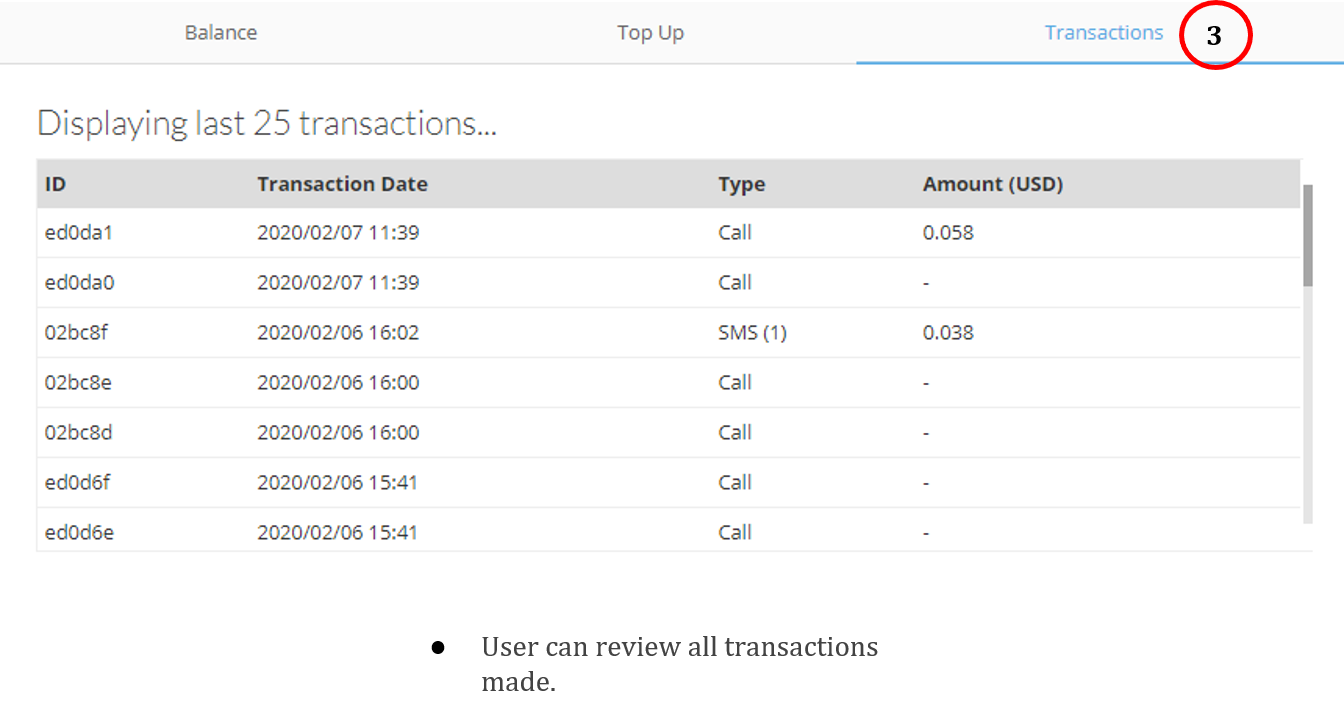
To access the Credit settings, click Account Tab → Settings → General → Credit. Using this function, users would be able to check current credit balance, top up additional credits to their account, as well as view all transactions made in their account.click to expand section
To check current credit balance, click the first “Balance” tab. The remaining credit balance for the account will be reflected as shown.

To top up the current credit balance, click the second “Top Up” tab. Fill in the payment information and click continue to add additional credits to the account.

To review transactions made by the account, click the third “Transactions” tab. All transactions that has been made would be reflected here in a table where users can review each transaction record.
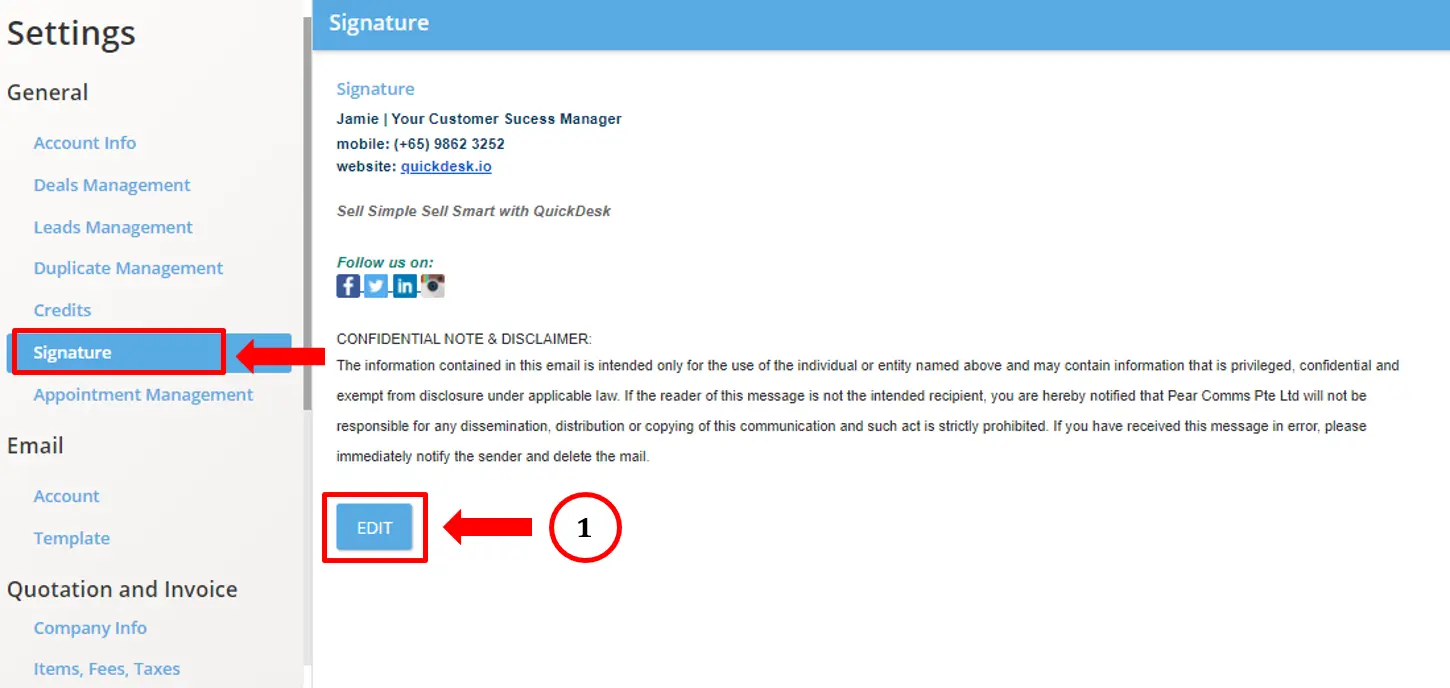
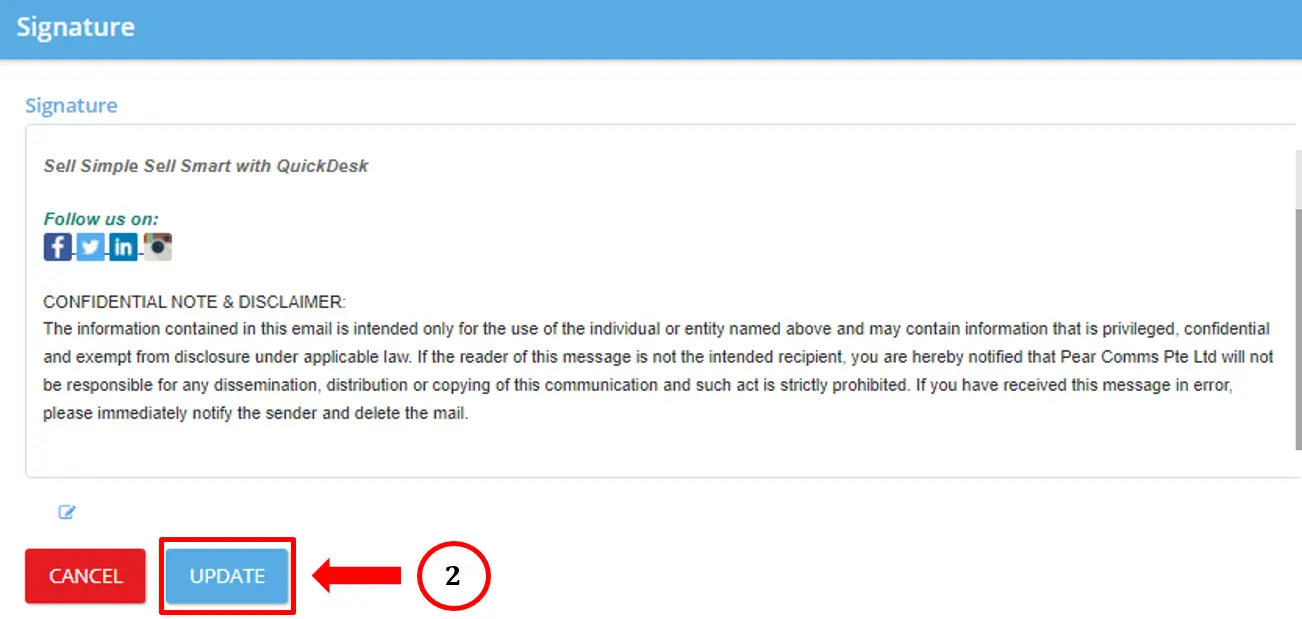
Signature
To access the Signature settings, click Account Tab → Settings → General → Signature. Using this function, users would be able to view their current signature, as well as customize it depending on user preference.click to expand section
To edit the current signature, click the edit button, and in the text field that follows, make the necessary and relevant changes to the signature. Once completed, click the update button to save the changes and the new signature should then be reflected on the main page.
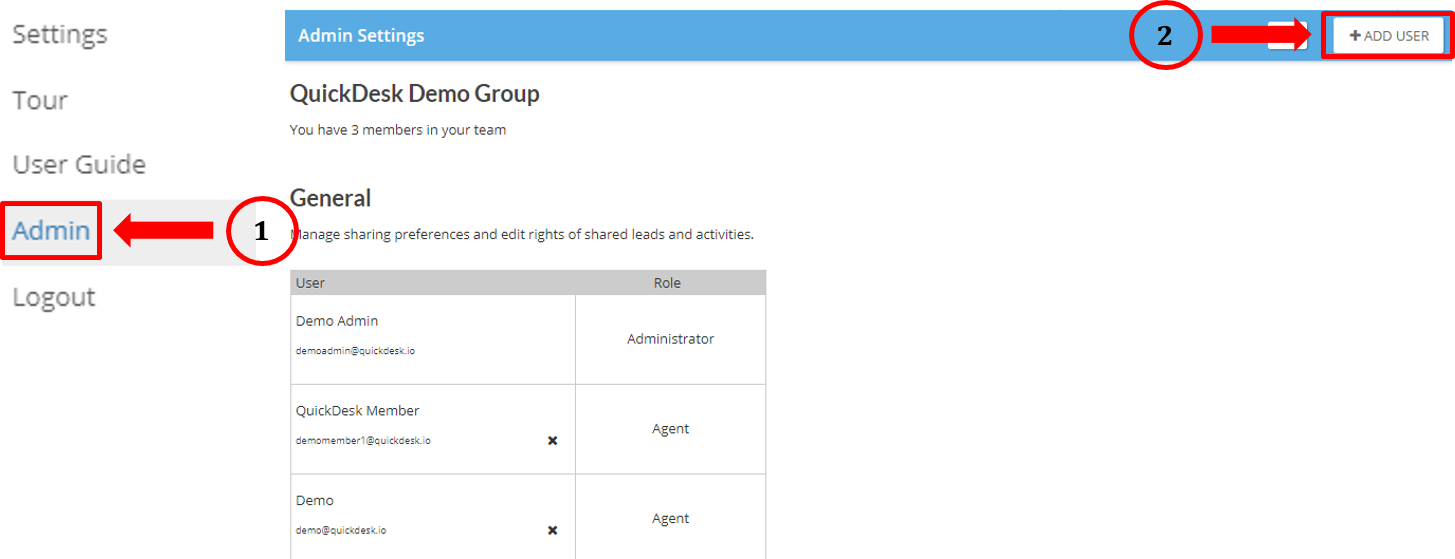
Admin
To access the Admin settings, click Account Tab → Admin. Only a verified admin account can access these settings to control the agent accounts. Here, an admin user can manage all quotations, orders, and templates, grant specific permissions to agents as well as view and edit all leads.click to expand section
To add a new user, click the “ADD USER” button on the top right. This would prompt a window requesting for the email address which would be linked to this new agent account. The admin can grant specific permissions to the agent account during account creation and click the invite button to complete the process.
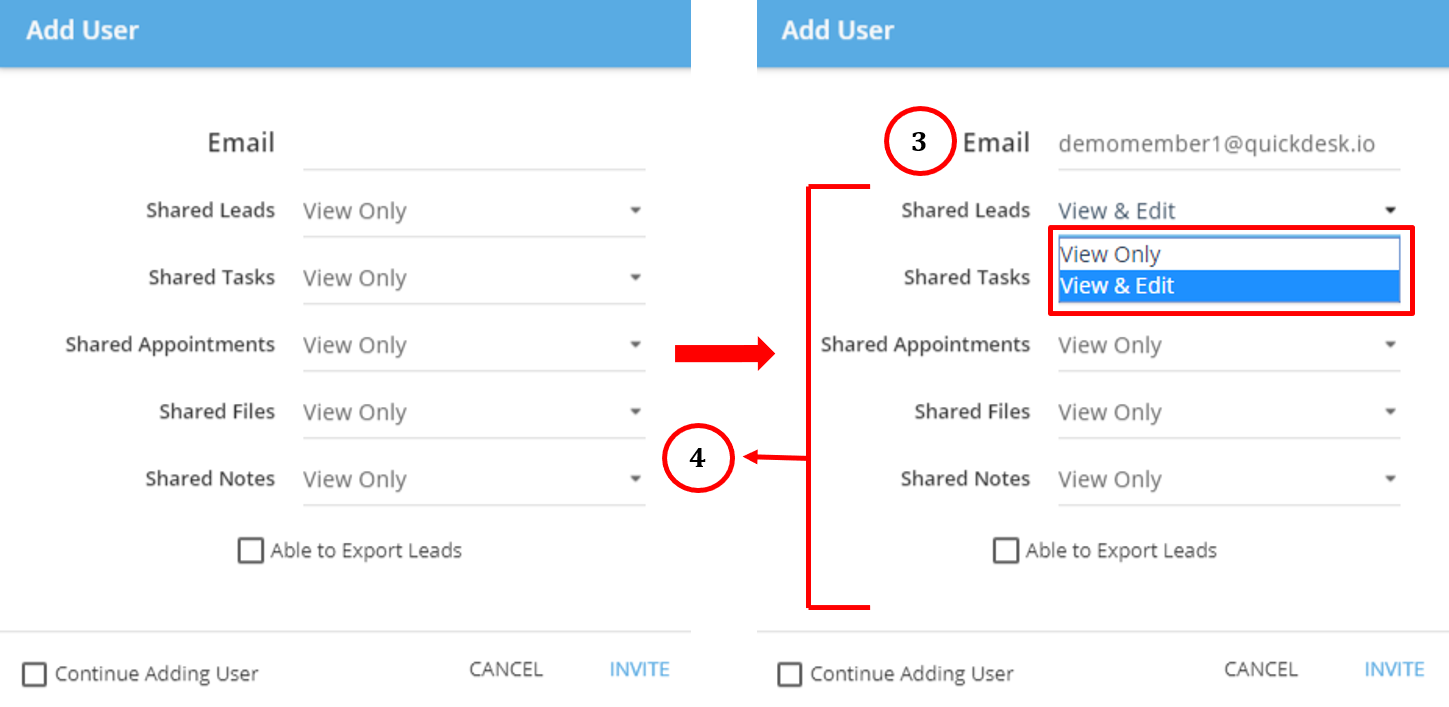
An account’s permissions can also be edited from the main page by simply clicking on the account to be edited and selecting from the drop-down options which permissions that specific account should be granted. Click the save button once complete to save all changes.

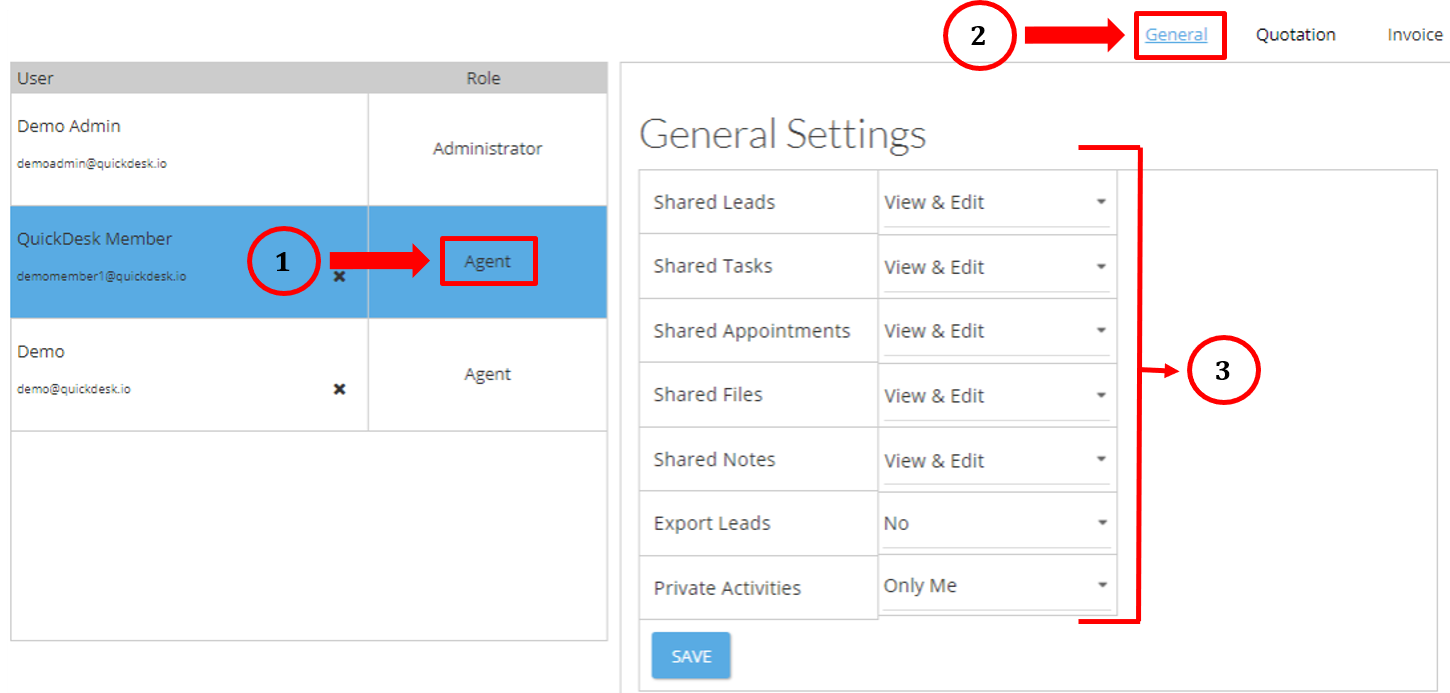
By clicking on the Quotation tab or the Orders tab, an admin may also edit the permissions being granted to the account regarding quotation and template management, along with their individual templates. Click the save button once complete to save all changes.

Email Settings
Email Account
To access the Email Account settings, click Account Tab → Settings → Email → Account. Using this function, a user can manage and configure email account settings.click to expand section
To configure the email account, click the “CHANGE CONFIG” button. The user should be redirected to the Email set up page, where the specified changes and edits can be made in the different text fields to properly configure the email account to integrate with the platform. Once the user has completed the changes, the user can test the connection, and if satisfactory, can proceed to update and save the changes made to the account configurations.


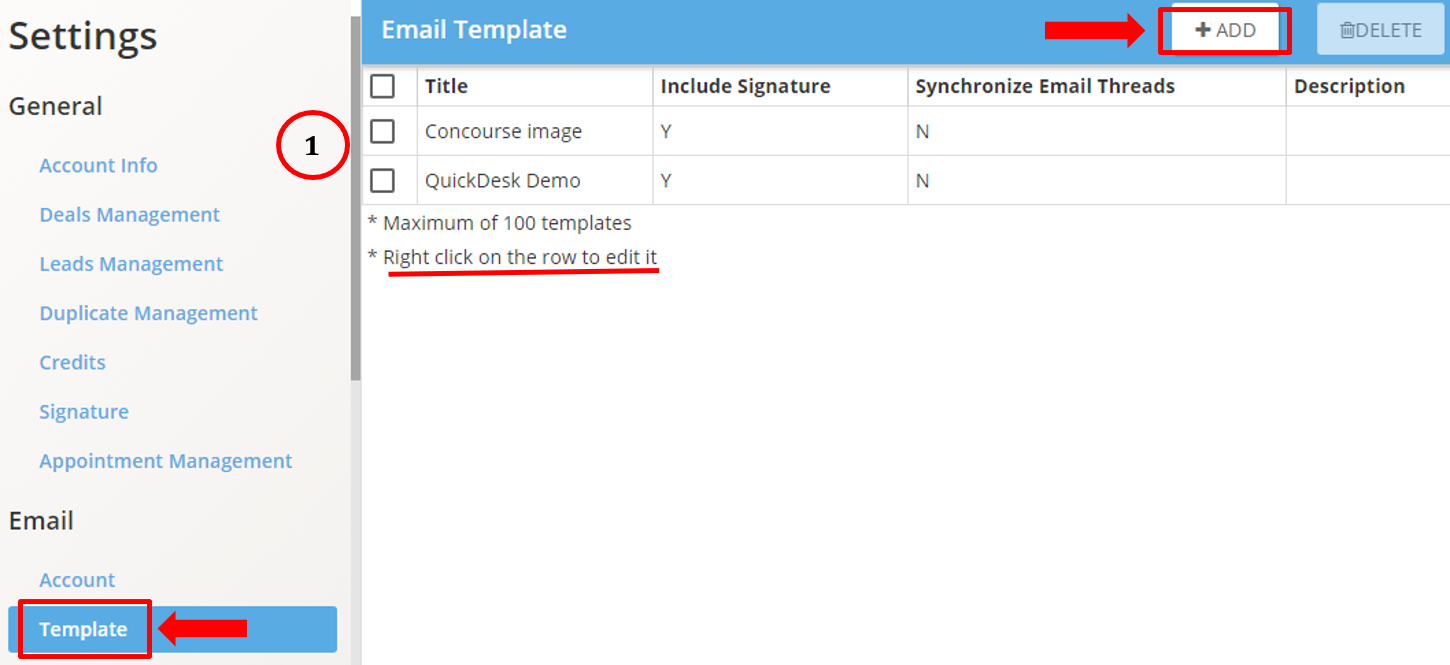
Email Template
To access the Email Template settings, click the Account Tab → Settings → Email → Template. Using this function, a user can add, edit, and delete email templates and customize them according to their specific purpose and preferences.click to expand section
To add a new email template, click the “ADD” button on the top right of the page. To edit an existing email template, right-click on the existing entry. Both would prompt a new window where the user can fill in the specified fields and make any relevant changes or edits to customize the email template for its specific use case. Once the changes have been made, click the save button would update the list and display the new or updated template entry. To delete an existing email template, click on the email templates to be deleted and press the “DELETE” button on the top right.


Quotation and Orders
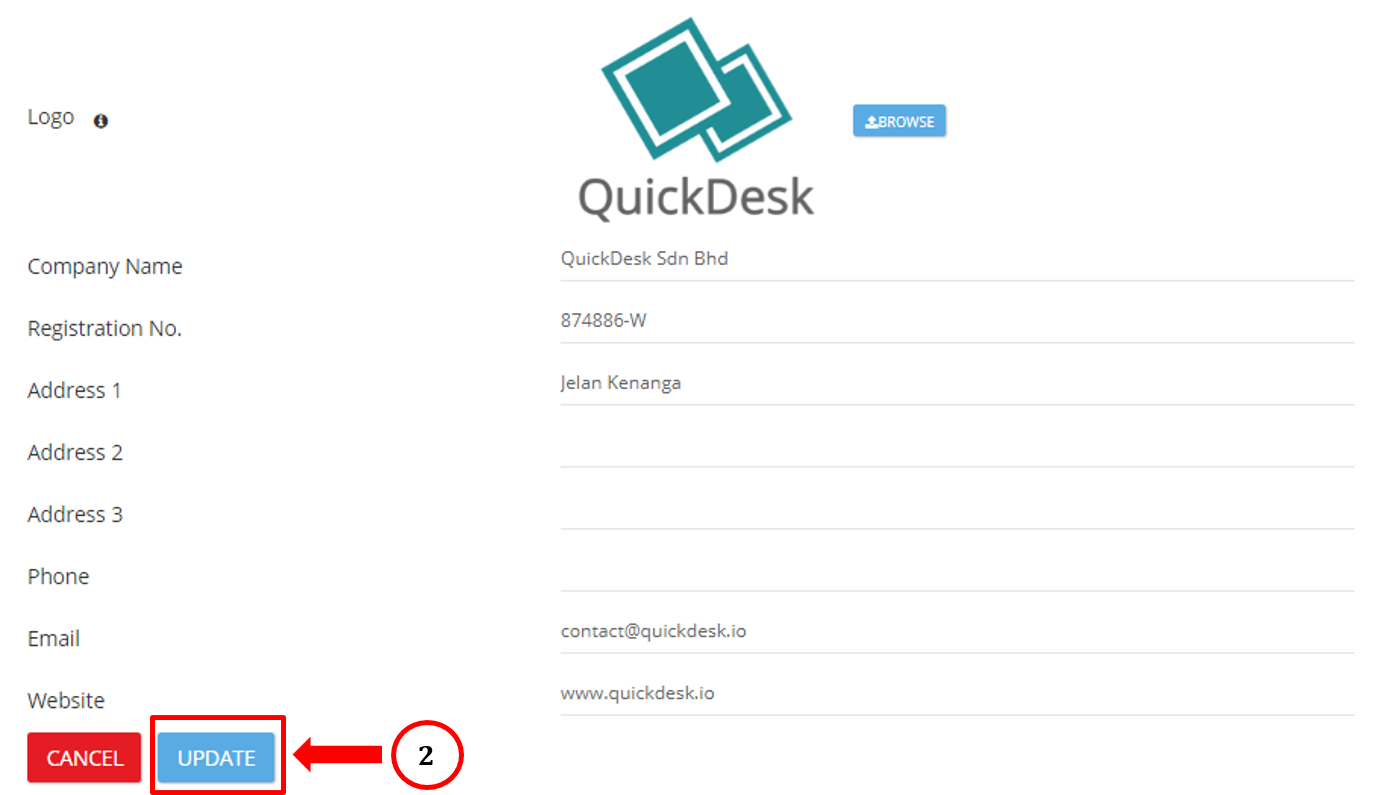
Company Information
To access the Company Information settings, click Account Tab → Settings → Quotation and Orders → Company Info. Using this function, a user can view and update the company information page.click to expand section
To update the company information page, click the “EDIT” button. It would redirect the user to a separate page where the user can edit and amend the specified information. Once the changes have been made, click update and the updated information would be reflected on the information page.

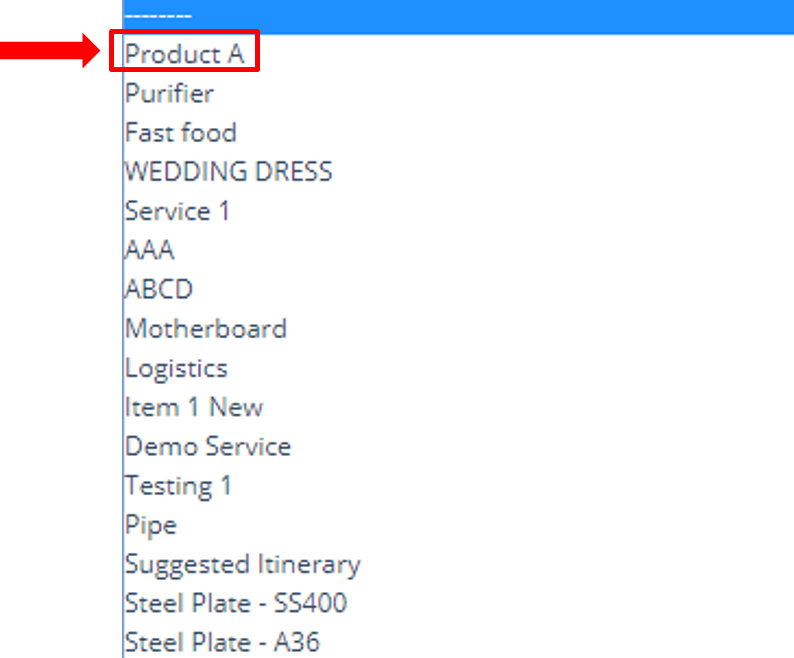
Items
To access the Items settings, click Account Tab → Settings → Quotation and Orders → Items, Fees, Taxes → Items. Using this function, a user can import, add, edit, and delete items from the list.click to expand section
To import items into the list, click the import button, and upload the specific data file, while ensuring that the data file adheres to the specified format shown on the page. Upon doing so, the newly imported items would then be reflected on the list. To add a new item, click the “ADD” button on the top right. This would prompt a window to appear where the user can fill in the required information and create the new item. To edit an existing item, right click the existing entry in the list, which will prompt a similar window to appear where a user can amend and edit the required information and update the item to reflect these changes. To delete an item, select the items to be deleted and click the “DELETE” button on the top right.


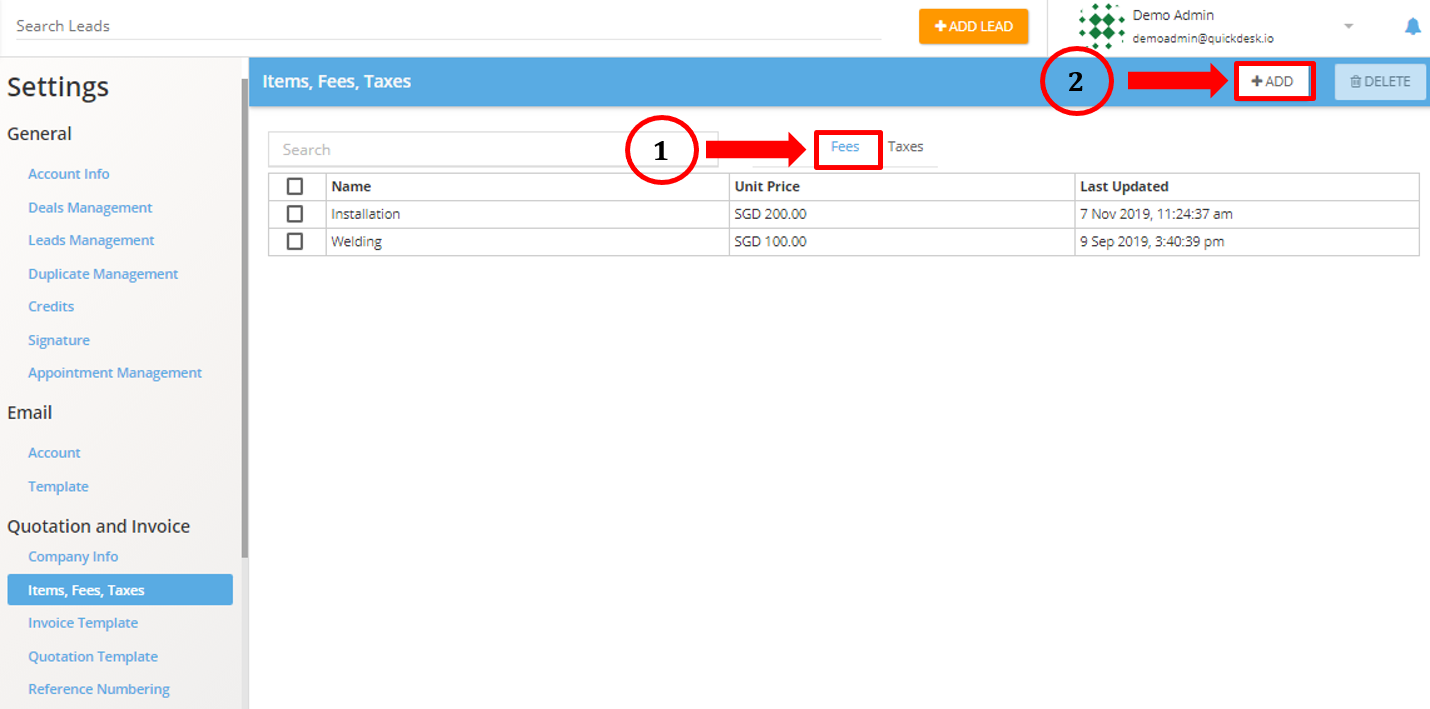
Fees
To access the Fees settings, click Account Tab → Settings → Quotation and Orders → Items, Fees, Taxes → Fees. Using this function, a user can add, edit, and delete fees from the list.click to expand section
To add a new fee, click the “ADD” button on the top right. This would prompt a window to appear where the user can fill in the required information and create the new fee. To edit an existing fee, right click the existing entry in the list, which will prompt a similar window to appear where a user can amend and edit the required information and update the fee to reflect these changes. To delete a fee, select the fees to be deleted and click the “DELETE” button on the top right.


Taxes
To access the Taxes settings, click Account Tab → Settings → Quotation and Orders → Items, Fees, Taxes → Taxes. Using this function, a user can add, edit, and delete taxes from the list.click to expand section
To add a new tax, click the “ADD” button on the top right. This would prompt a window to appear where the user can fill in the required information and create the new tax. To edit an existing tax, right-click the existing entry in the list, which will prompt a similar window to appear where a user can amend and edit the required information and update the tax to reflect these changes. To delete a tax, select the taxes to be deleted and click the “DELETE” button on the top right.


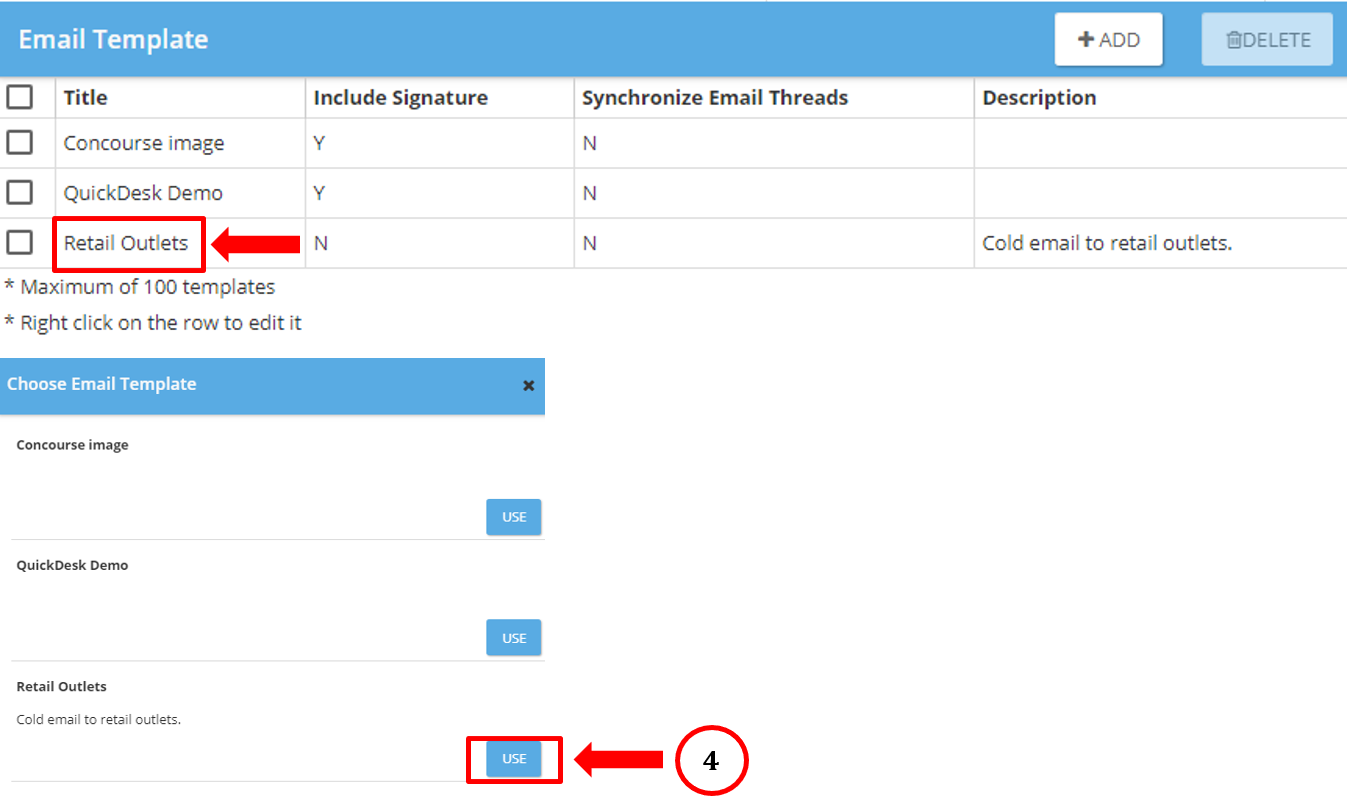
Order Template
To access the Order Template settings, click Account Tab → Settings → Quotation and Orders → Order Template. Using this function, a user can add, edit, and delete order templates from the list. The user can also amend global settings for the order templates according to their preference and usage case.click to expand section
To add a new order template, click the “ADD” button on the top right. This would prompt a window to appear where the user can fill in the required information and create the new order template. To edit an existing order template, right-click the existing entry in the list, which will prompt a similar window to appear where a user can amend and edit the required information and update the order template to reflect these changes. To delete an order template, select the templates to be deleted and click the “DELETE” button on the top right. To configure the global settings, click the blue-button above the list, which will prompt a separate window where the user can customize the settings.
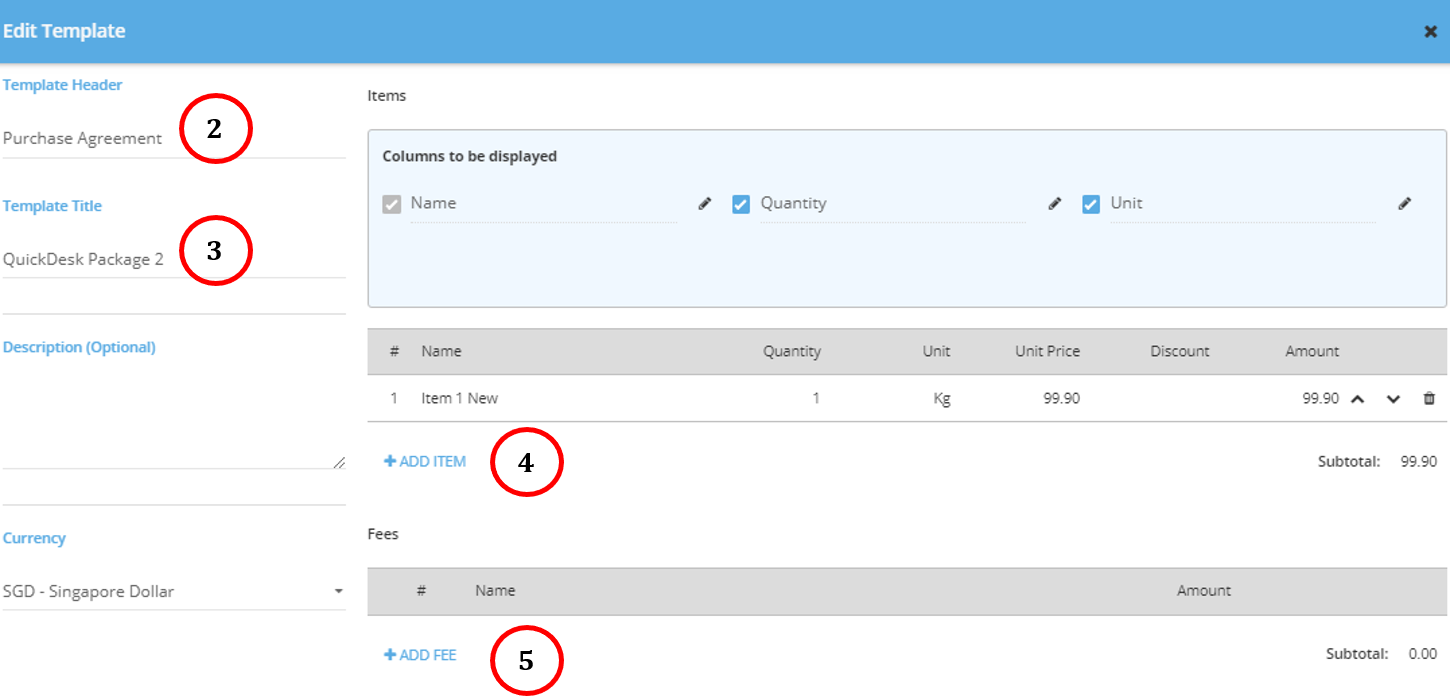
Quotation Template
To access the Quotation Template settings, click Account Tab → Settings → Quotation and Orders → Quotation Template. Using this function, a user can add, edit, and delete quotation templates from the list. The user can also amend global settings for the quotation templates according to their preference and usage case.click to expand section
To add a new quotation template, click the “ADD” button on the top right. This would prompt a window to appear where the user can fill in the required information and create the new quotation template. To edit an existing quotation template, right-click the existing entry in the list, which will prompt a similar window to appear where a user can amend and edit the required information and update the quotation template to reflect these changes. To delete a quotation template, select the templates to be deleted and click the “DELETE” button on the top right. To configure the global settings, click the blue-button above the list, which will prompt a separate window where the user can customize the settings.


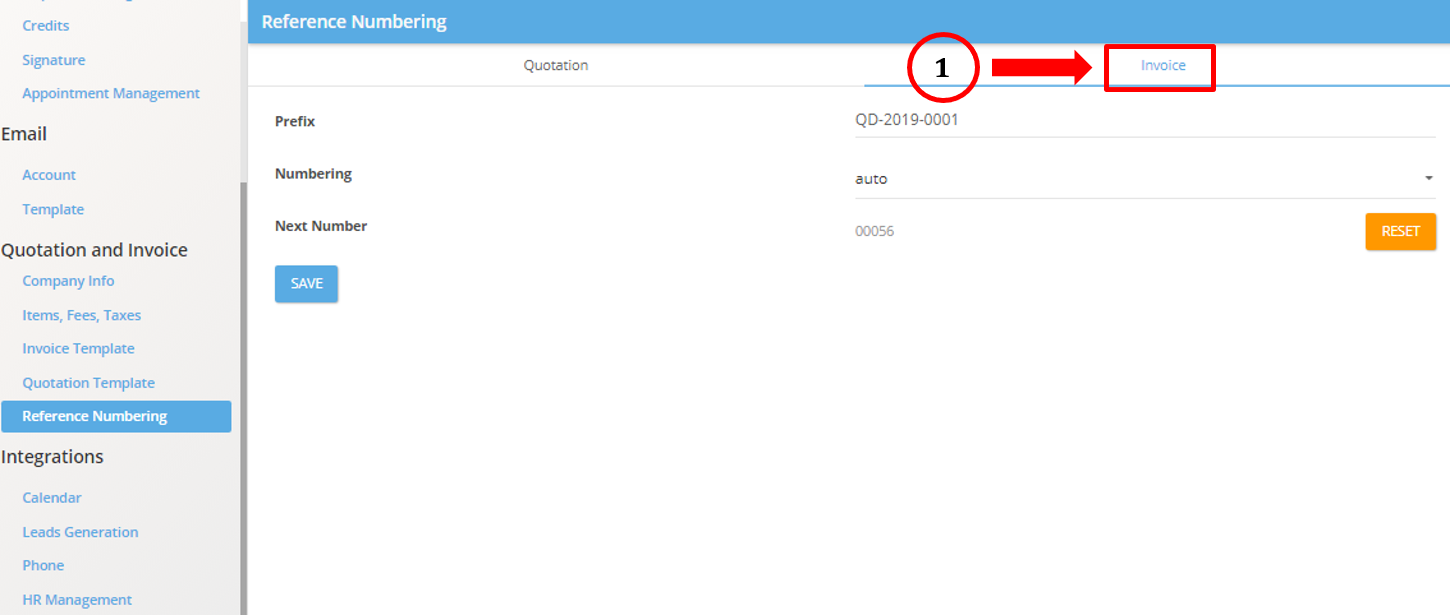
Reference Numbering
To access the Reference Numbering settings, click Account Tab → Settings → Quotation and Orders → Reference Numbering. Using this function, a user can edit the reference numbering format for new quotations and invoices that are being generated.click to expand section
Under the specific quotation and invoice sections, the user can make any relevant changes to the format and numbering of new quotations and invoices being generated. Once the edits have been made, click the “SAVE” button and subsequent quotations and invoices will be generated with this new reference numbering.

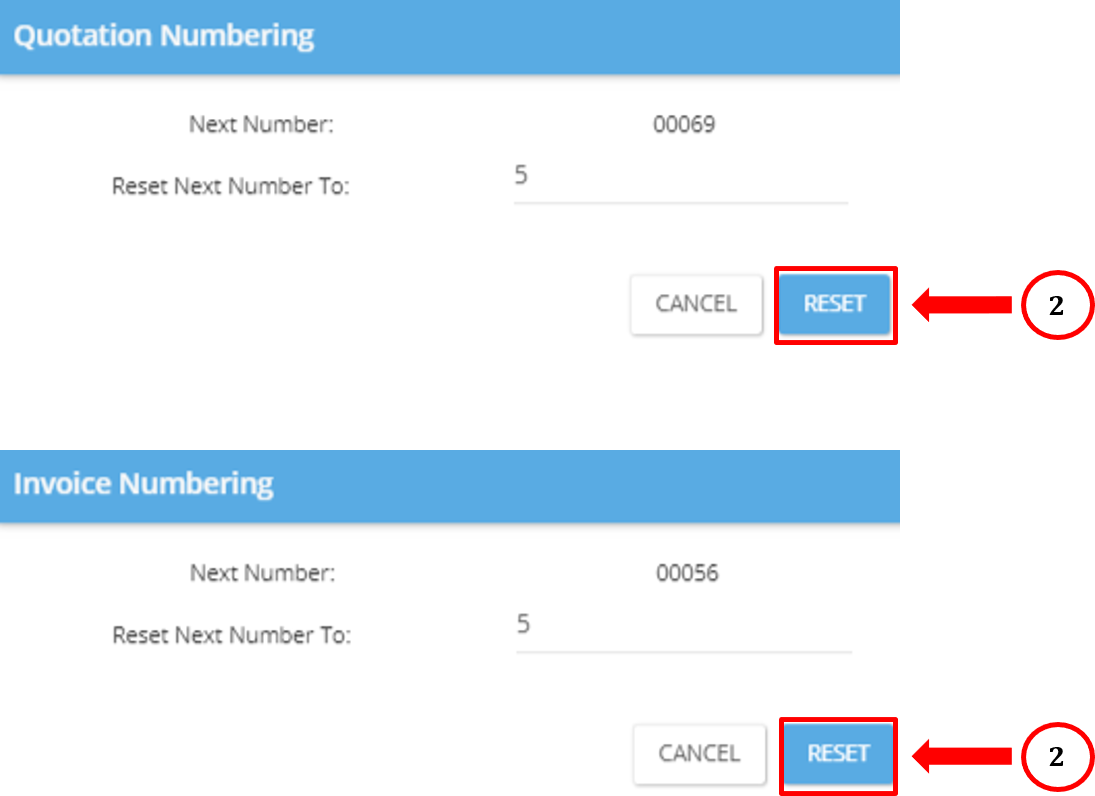
To reset the reference numbering for quotations and invoices back to a specific number, click the “RESET” button, which will prompt a new window where users can choose which number to reset it to.
Integrations
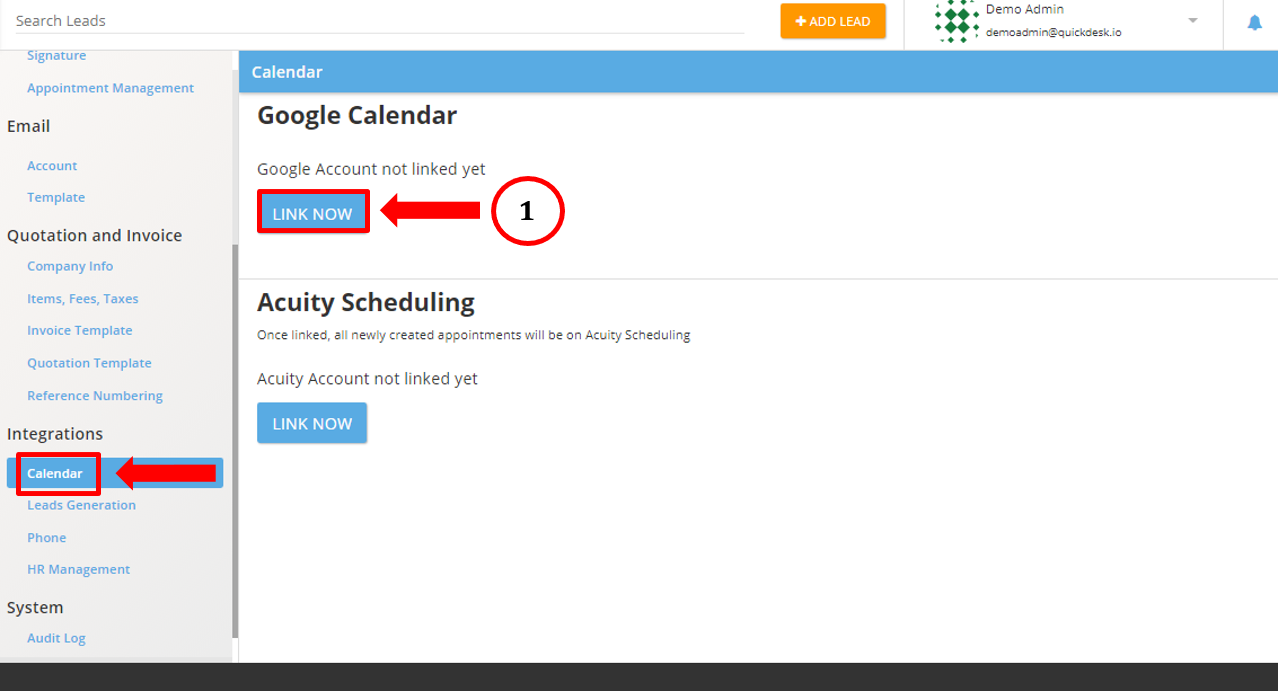
Calendar
To access the Calendar settings, click Account Tab → Settings → Integrations → Calendar. Using this function, a user can link or unlink their google calendar as well as acuity scheduling to the QuickDesk platform.click to expand section
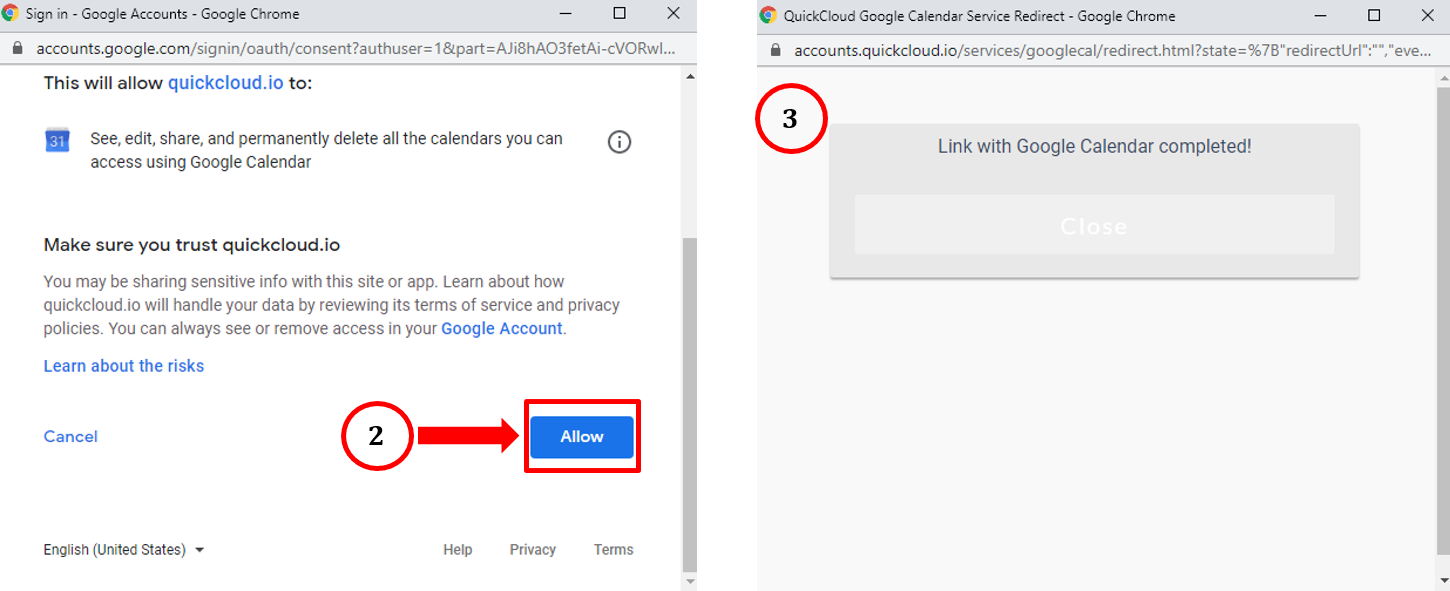
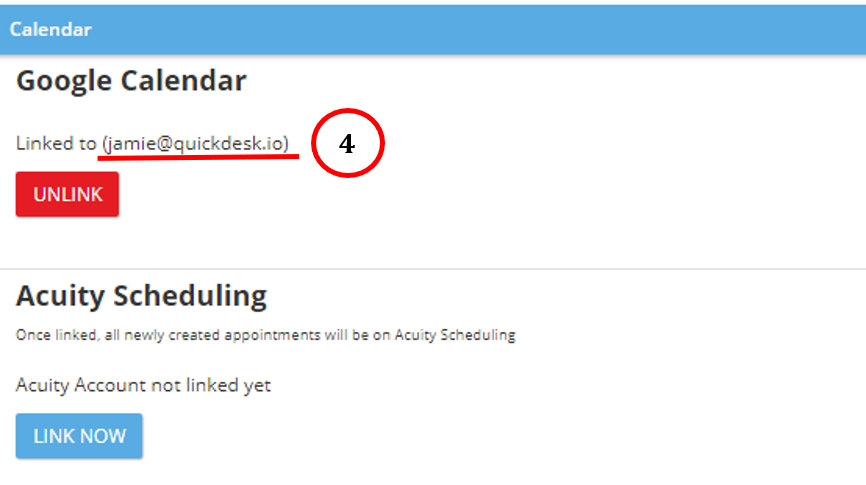
To link an external entity to QuickDesk, certain permission must be granted upon clicking the “LINK NOW” button. Allow those permissions and ensure the account information being linked is accurate. Once successfully linked, it should be reflected on the main page. To unlink the account, simply click the “UNLINK” button.
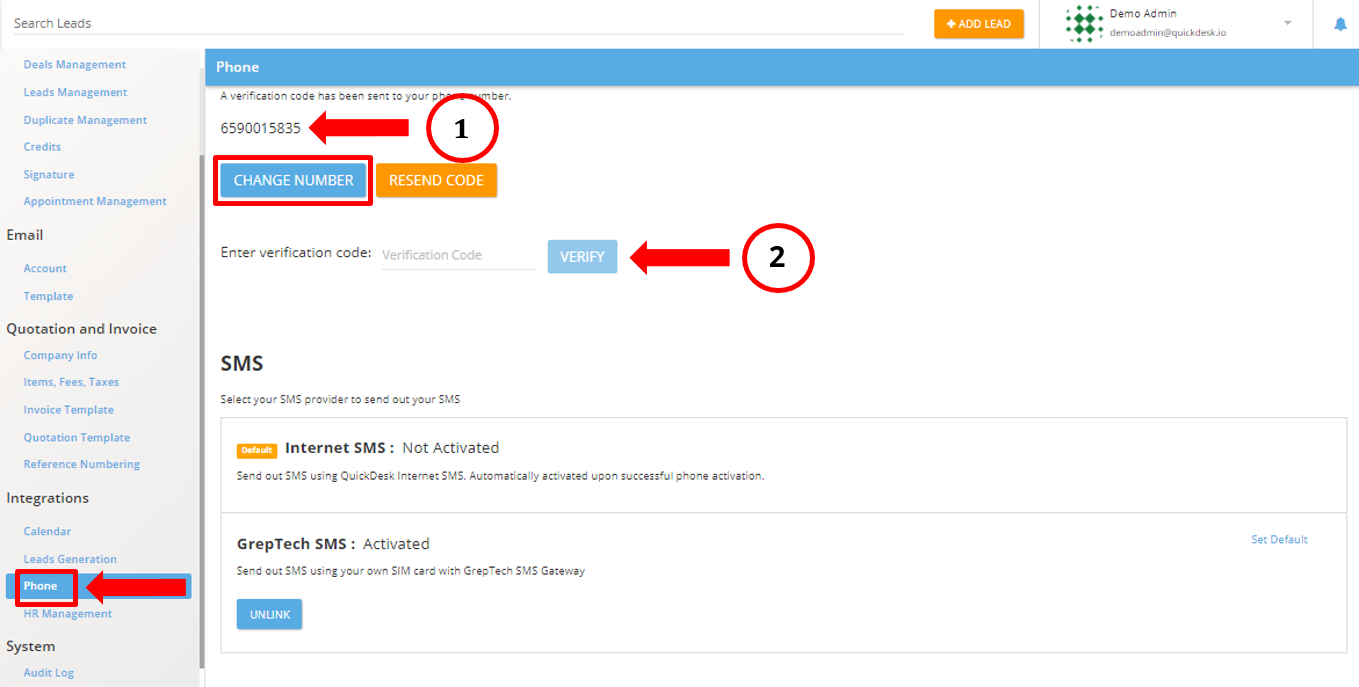
Phone
To access the Phone settings, click Account Tab → Settings → Integrations → Phone. Using this function, a user can link a phone number to the QuickDesk platform, manage and configure call and SMS settings depending on their preference and usage case.click to expand section
Firstly, link a phone number to the platform. Once the phone number has been verified and activated, the user can configure the call prompt and auto call record settings depending on their preference. The user can also configure the SMS provider settings depending on how they want their SMSes to be disseminated. To remove or deactivate the phone number from the platform, simply click the “DEACTIVATE” button.
QuickDesk Marketing (aka ActiveCampaign) SMS Template
To access the QuickDesk Marketing (aka ActiveCampaign) SMS Template, click Account Tab → Settings → Integrations → SMS Template. Using this function, a user can create SMS templates and generate an SMS webhook, to automate an SMS blast within their QuickDesk Marketing (aka ActiveCampaign) automation.click to expand section
Firstly, to create an SMS template click the “ADD” button located on top of the page and a window “New SMS Template” will pop up.

Then, fill up the details at the left side of the pop up which is the “Template Title” and “Description (optional)”. “Template Title” field allows the user to name the SMS template for easy reference and the “Description” field allows the user to briefly describe in text what the SMS template does.

Next, create your SMS template at “Content” Area. For reference to build your SMS template, scroll down at the left panel of the window to read the guide.
Once the SMS template is created, click the “SAVE & GENERATE LINK” button. An SMS webhook link will be generated.

Copy the webhook link and paste it into the webhook action in your QuickDesk Marketing (aka ActiveCampaign) automation but ensure that “https://” is added before pasting the SMS Blast Webhook Link.
Omnichannel Engagement
Through our Omnichannel Engagement feature, a user can integrate and manage various chat channels into a single messaging platform. Supported channels include (Do contact us if you need to enable any of the communication channels): Whatsapp, Telegram, SMS and Facebook Messenger.click to expand section
Omnichannel Modules allow ease of access to manage their chat channels through a single platform. Users will first need to set up their Omnichannel engagement feature by clicking on the (1) Settings → (2) Integrations → (3) Phone → (4) Switch to Text Mode → (5) Activate Chat.

To use the engagement feature;
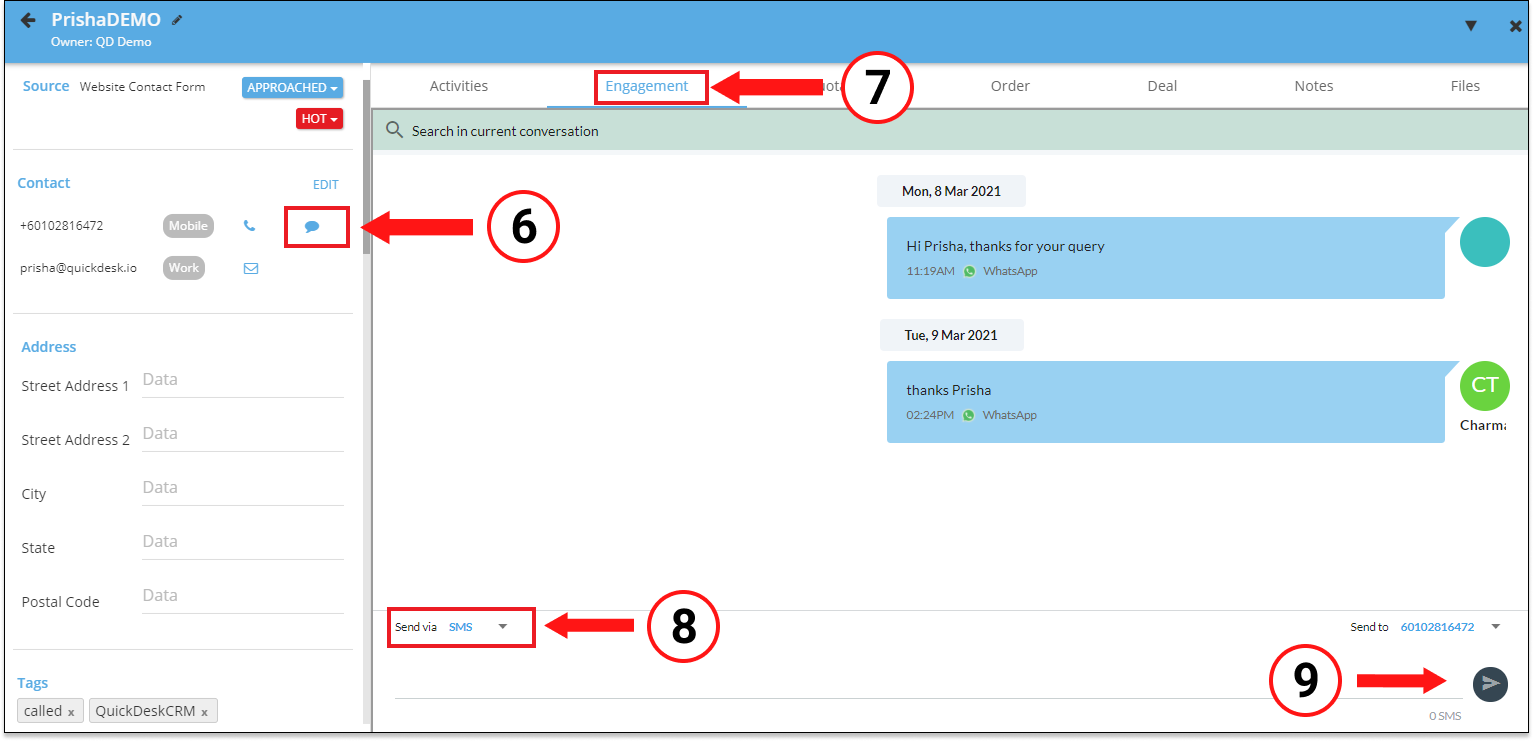
Right-click on the lead’s contact name to open up the contact card. Proceed to click the chat bubble icon within the contact card as seen in the image below (6). Do note, only contacts with a mobile number will have the chat bubble icon.
Clicking on the chat bubble icon will direct the users to the engagement module interface as shown in the image below (7).
Users will then be presented with the chat interface in which they can choose to reply to messages from the various channels integrated by clicking on their channel preference (8).
Use the send button (9) to send your messages and replies.
Our Omnichannel Engagement Feature is brought to you by Moobidesk, Singapore’s leading omnichannel service provider.
Whatsapp Prices for SG and MY are different. It is based on Whatsapp Pricing with an additional SGD 0.20 per WhatsApp message charged by MavenLab.
Leads
Add Lead
To add Leads, navigate to the Leads Page from the left sidebar and click the “ADD LEAD” button on the top of the page. Using this function, a user can add or import specific leads into the existing list on the platform.click to expand section
To add a new Person as a lead, click “Person”, which will prompt a new window where the user can edit and fill in the required information, before clicking save to update the existing list with this new person as a lead.
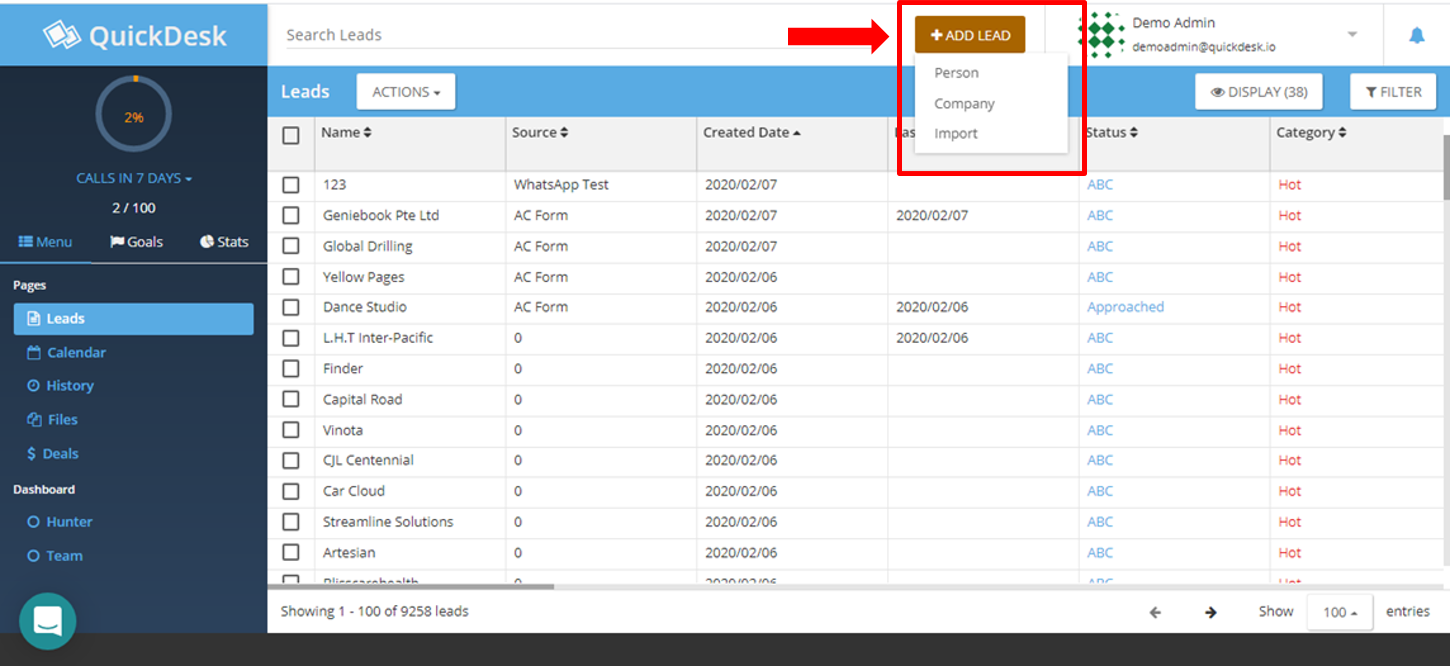

To add a new Company as a lead, click “Company”, which will prompt a new window where the user can edit and fill in the required information, before clicking save to update the existing list with this new company as a lead.

To import persons or companies as new leads, click the “Import” button and add in the datafile with the relevant data in the specified format to add new leads to the platform.

Lead Info Card
To view the Lead Info Card, navigate to the Leads Page from the left sidebar and simply right click on the specific lead entry, which will prompt a pop-up window with the required information. Here the user can perform several functions, such as viewing and editing lead information, contacting the lead, as well as viewing and editing tasks, appointments, orders, quotations, and deals related to the lead.click to expand section


Add Notes
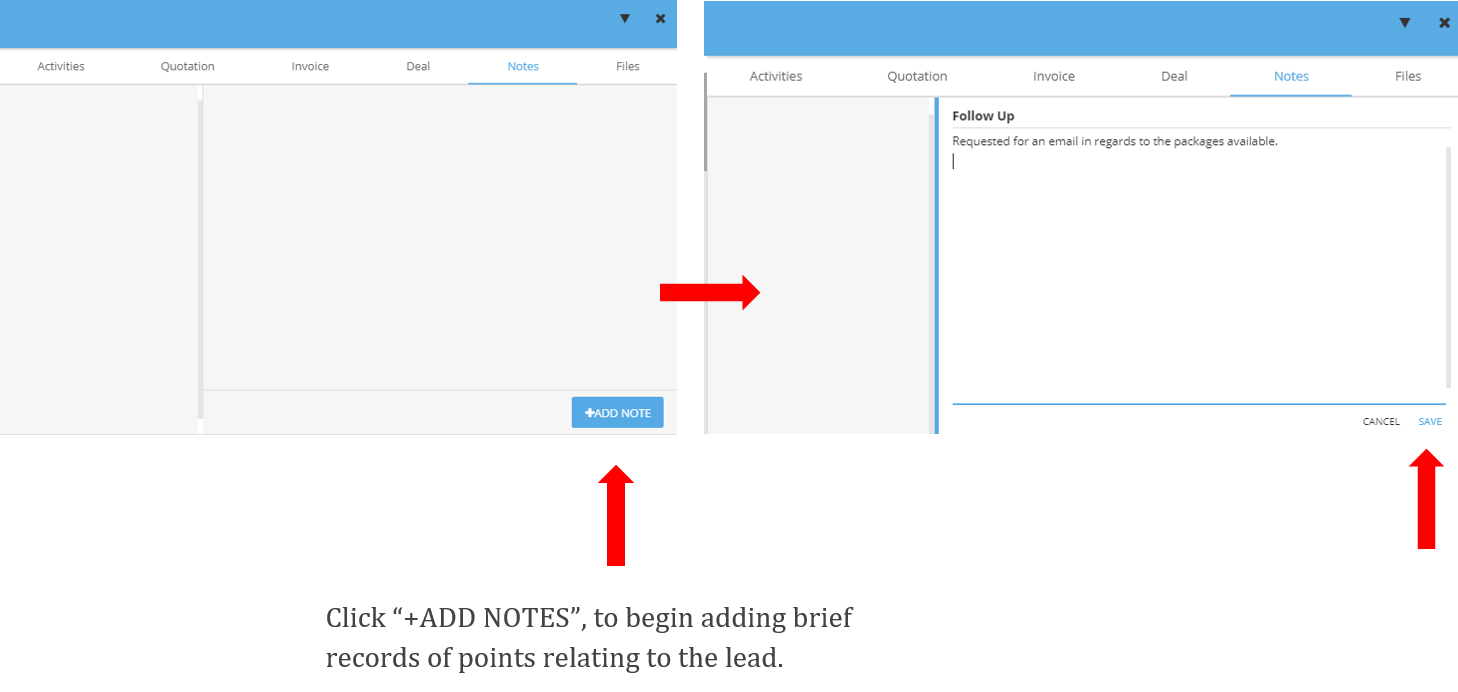
To add a note to a lead, navigate to the Leads Page from the left sidebar, right-click on the specific lead entry, and then to the “Notes” tab. Using this function, the user can add specific notes relating to the lead and keep a record of certain important points.click to expand section
Once navigated to the “Notes” tab, click the “ADD NOTE” button and in the text field that follows, write down the notes to be taken, before clicking save to update these notes to the record.
Share Lead
To share a lead, navigate to the Leads Page from the left sidebar, right click on the specific lead entry and then to the “More” tab. Using this function, the user can share specific information about the lead with other people via email.click to expand section
Once in the information page, click the downward-facing arrow on the top right and click “Share”. This would prompt a separate window to appear allowing the user to select which information to be shared with which email addresses the user chooses to include and share this lead with.

Calendar
Add Task
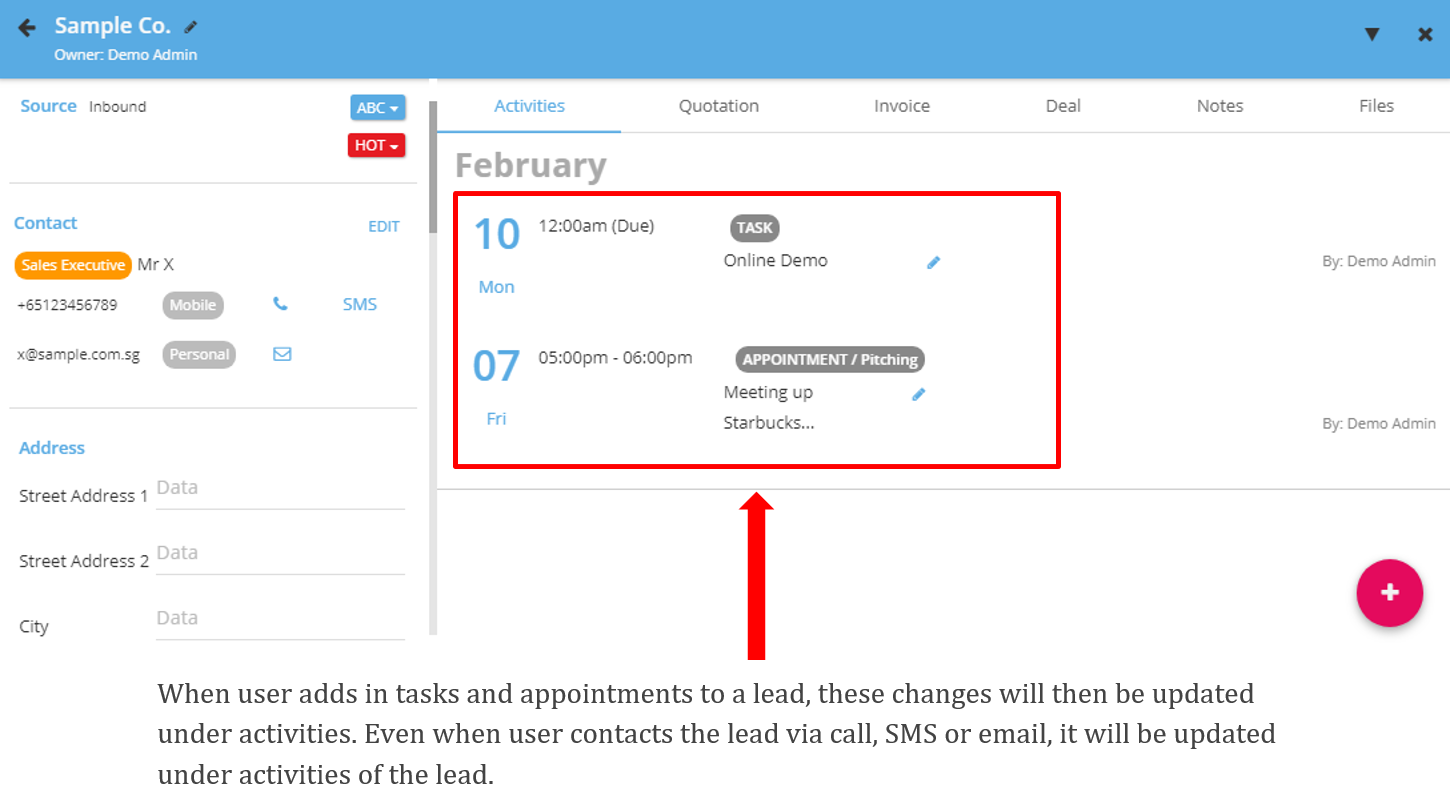
To add a Task, navigate to the Calendar Page from the left sidebar, click on the “ADD” button on the top right and then to the “Task” button. Using this function, the user can add tasks and link them to specific leads, which will be reflected on the calendar and updated under lead activities.click to expand section
Once the required fields have been filled in, users can choose to link this task with specific related leads, before pressing save to record this task in the calendar. Linking specific leads would result in the lead activities section being automatically updated as well.

Add Appointment
To add an Appointment, navigate to the Calendar Page from the left sidebar, click on the “ADD” button on the top right and then to the “Appointment” button. Using this function, the user can add appointments and link them to specific leads, which will be reflected on the calendar and updated under lead activities.click to expand section
Once the required fields have been filled in, users can choose to link this appointment with specific related leads, before pressing save to record this appointment in the calendar. Linking specific leads would result in the lead activities section being automatically updated as well.


Files
Upload File
To upload a File, navigate to the Files Page from the left sidebar, click on the “FOLDERS” button on the top left and then the “Upload File” button. Using this function, the user can upload files to the platform, and link them to specific leads.click to expand section
Alternatively, users can also navigate to the Files tab on the Lead Info Page, and directly upload a file from there, which will be automatically linked to the specific related lead.

Deals
Add Order
To add an order, navigate to the Leads Page from the left sidebar, right-click on the specific lead entry and click the “MORE” tab. On the bottom right, hover over the pink button and click “ADD ORDER”. Using this function, the user can add orders and link them to specific leads.click to expand section
When the user chooses to add a new order, a separate window will appear, prompting the user to select from a list of existing templates. Once the desired template has been chosen, the user can fill in the required text fields, and proceed to save the order as a draft, or generate the order immediately, which will update the lead with the new order.
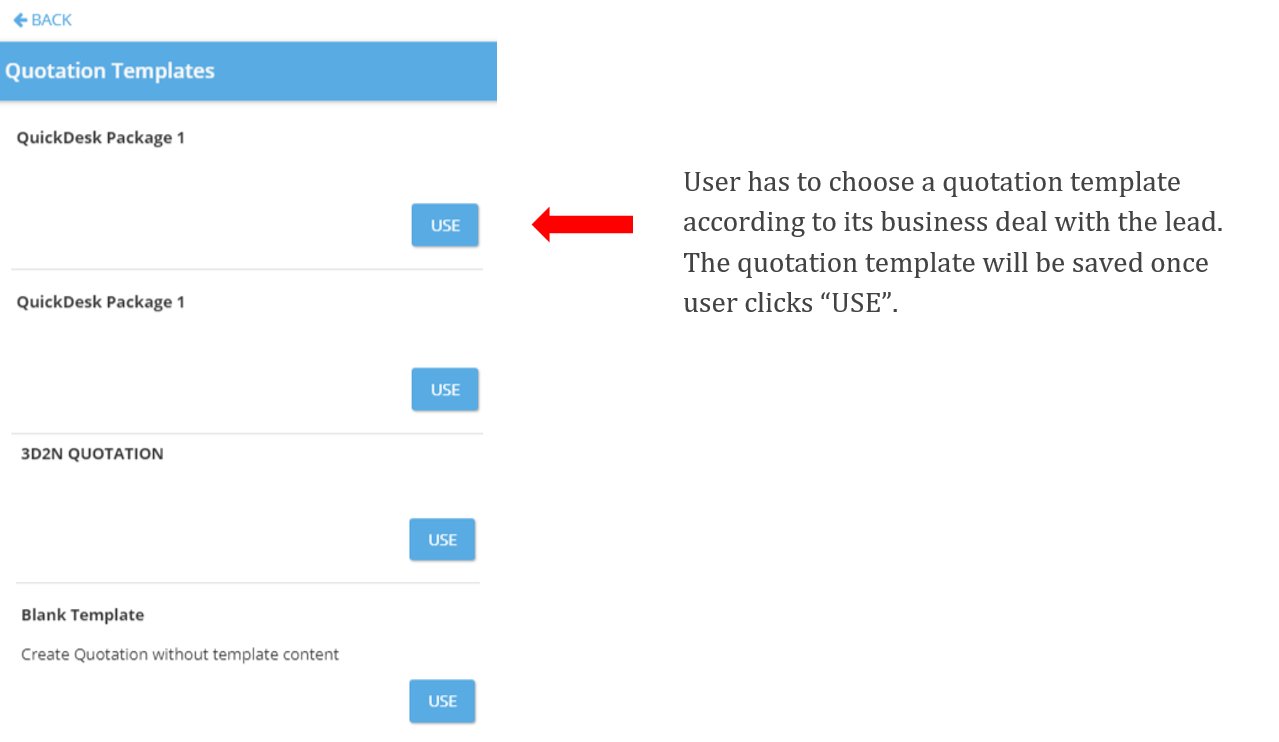
Add Quotation
To add a quotation, navigate to the Leads Page from the left sidebar, right click on the specific lead entry and click the “MORE” tab. On the bottom right, hover over the pink button and click “ADD QUOTATION”. Using this function, the user can add quotations and link them to specific leads.click to expand section
When the user chooses to add a new quotation, a separate window will appear, prompting the user to select from a list of existing templates. Once the desired template has been chosen, the user can fill in the required text fields, and proceed to save the quotation as a draft, or generate the quotation immediately, which will update the lead with the new quotation.
Add Deal
To add a deal, navigate to the Leads Page from the left sidebar, right click on the specific lead entry and click the “MORE” tab. On the bottom right, hover over the pink button and click “ADD DEAL”. Using this function, the user can add deals and link them to specific leads.click to expand section
When the user chooses to add a new deal, a separate window will appear, prompting the user to fill in the required text fields, and proceed to create the deal, which will update the lead with the new deal.

Others
Hunter Dashboard
The Hunter Dashboard is designed to provide an overview of all existing leads, as well as streamline the entire lead hunting process. To access this function, navigate to the Hunter tab under “Dashboard” from the left sidebar.click to expand section
Upon entering the Hunter Dashboard, the user can view all Leads that has been found in a consolidated list. From there, users can select certain leads from the list, and add them to a separate “HUNT LIST”. Once all specified lead entries have been added to the Hunt List, the user can start mass calling, emailing, or blasting SMSes to all the leads in the list.


Team Dashboard
The Team Dashboard is designed to provide an overview of all team members, to streamline progress and performance tracking. To access this function, navigate to the Team tab under “Dashboard” from the left sidebar.click to expand section
Upon entering the Team Dashboard, the user can view the sales statistics of team members, allowing the user to track team performance and key performance indicators more effectively.


Mobile
Target
Create a Target
To create a new target, navigate to the Menu sidebar by clicking the burger icon on the top left corner and click "Target".click to expand section
Firstly, click the “+” icon at top right to start creating a target.

Write the target amount, start date and duration of the target.

To confirm the target details and create the target, click the “tick” icon at top right.
Leads
Import Leads
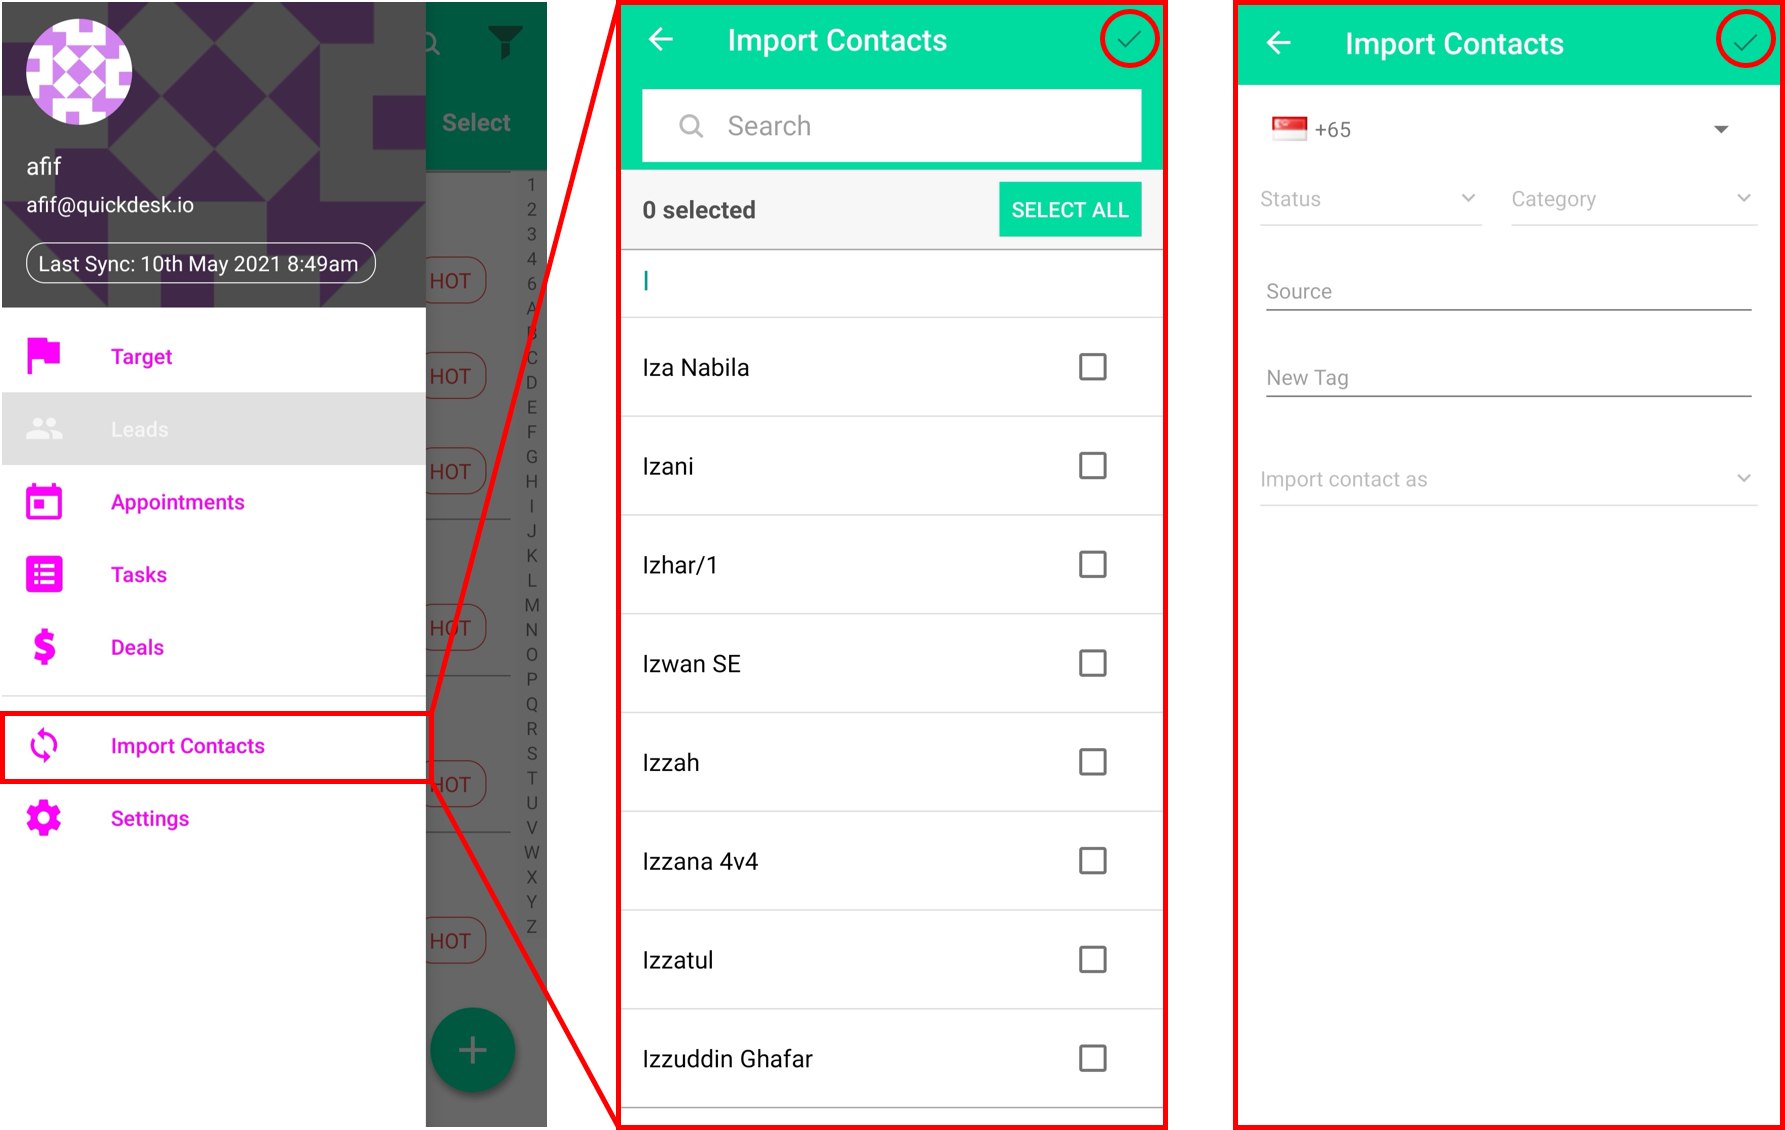
To import leads, navigate to the menu sidebar by clicking the burger icon on top left corner and click "Import Contacts".click to expand section
Select the contacts to import and click the "tick" icon on the top right corner to confirm selection. A page will appear to allow make edits such as Lead Status, Lead Category, Lead Source, Lead Tags, and Lead Type (Person, Company), then when details are confirmed click "tick" to confirm details and import the leads.
Create a New Lead
To add a new lead, navigate to the menu sidebar by clicking the burger icon on top left corner and click "Leads".click to expand section
Firstly, navigate to create lead page by clicking the "plus" icon on the bottom right corner and choose "Person" or "Company".

Then, fill up "Person Info" fields, followed by "Contacts" fields and perhaps add some tags to make the lead filtering process more easy.

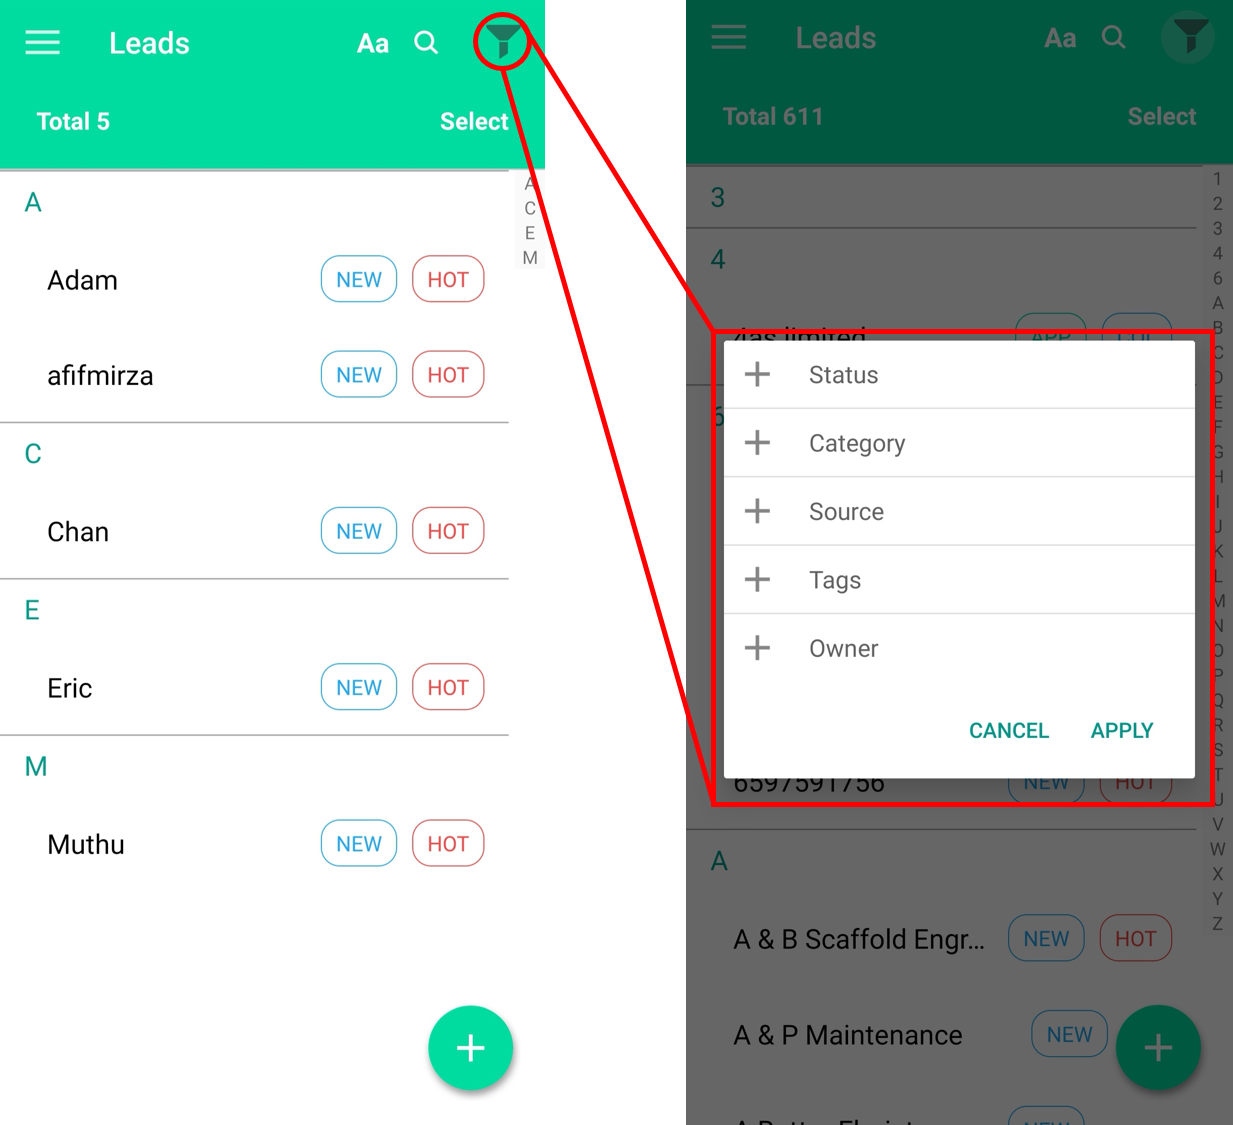
Filter Leads
To filter a lead or leads, navigate to the Menu sidebar by clicking the burger icon on the top left corner and click "Leads".click to expand section
Then, click the "filter" icon at the top right corner to set filter settings. When filter settings are finalized, click the "APPLY" button to confirm it. When clicked, a new list of leads is created based on the filter settings set.
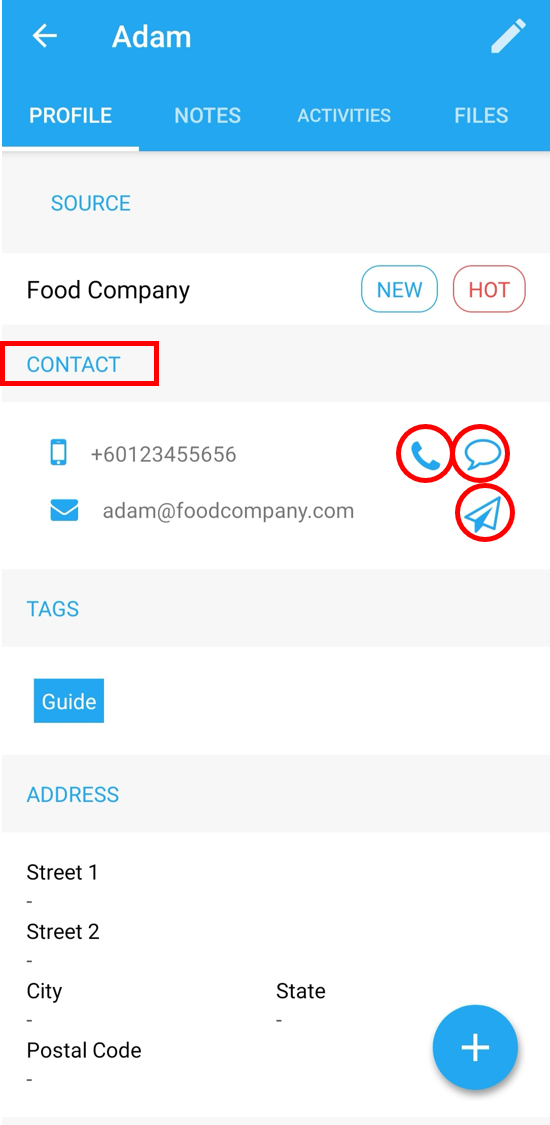
Engagement (Call, SMS, Email)
To make engagements to contacts via call, SMS or email, navigate to the Menu sidebar by clicking the burger icon on the top left corner and click "Leads".click to expand section
Select desired contact and engagement information will be revealed under the "Contact" section. Click the "phone" icon to call, "speech bubble" icon to send an SMS located beside the contact's phone number. To email the contact, click the "paper plane" icon located beside the contact's email.
Add Items from a Lead
To add items (notes, appointments, tasks, deals, and files) for a lead, navigate to the Menu sidebar by clicking the burger icon on the top left corner and click "Leads".click to expand section
Select desired contact and the contact page appears. Navigate to below right corner and click "plus" icon and choose which item to create.

Edit and Delete Lead
To edit a lead's information or delete the lead, navigate to the menu sidebar by clicking the burger icon on top left corner and click "Leads".click to expand section
Then, select desired contact and the contact page appears. At top right, click the "Pencil" icon to start editing. After editing on the contact is done, click the "tick" icon on top right to confirm the edit done.
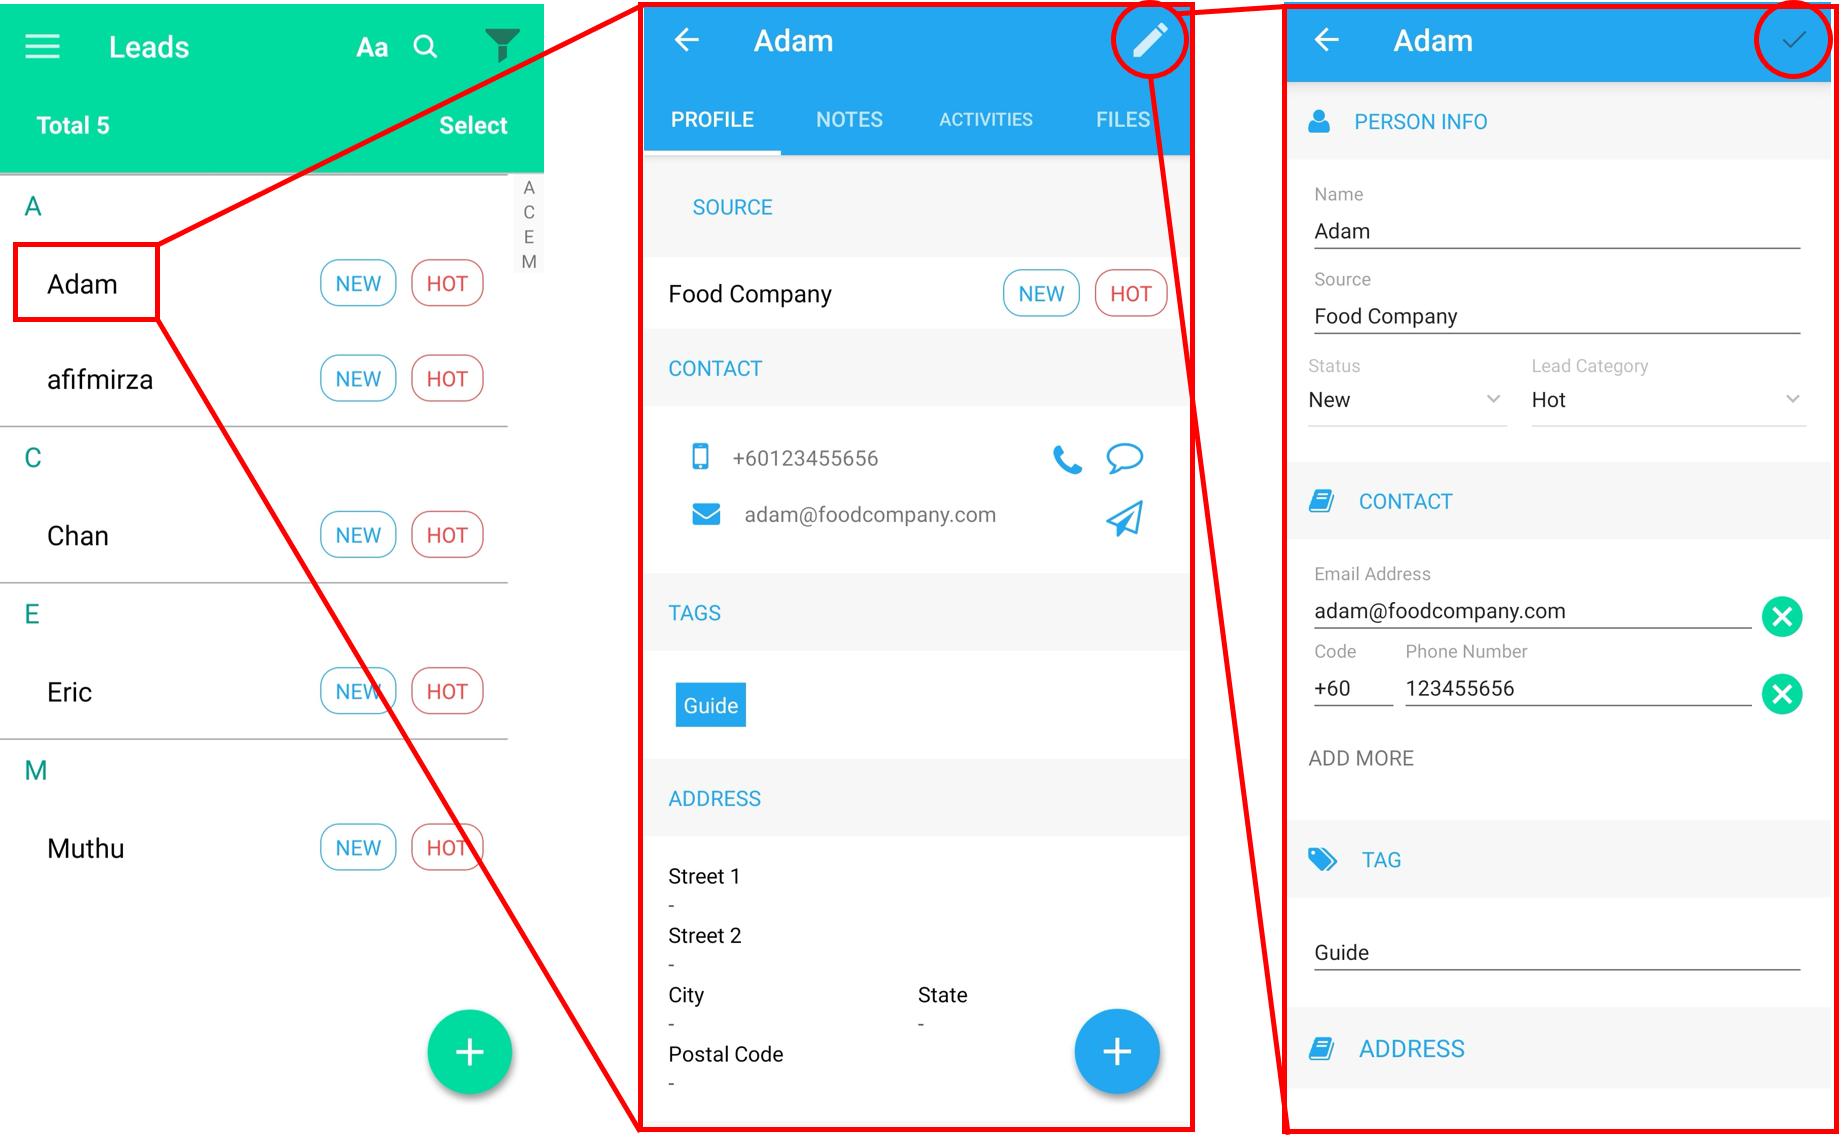
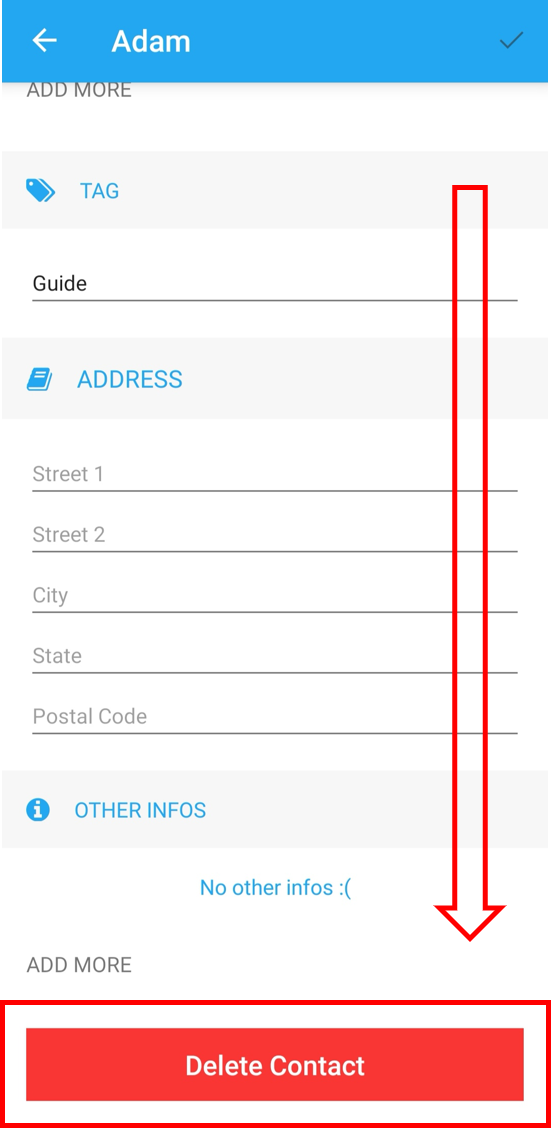
To delete the contact, click the “pencil” icon, scroll down the editing page until bottom and click “Delete Contact”.
Appointments
Create Appointments
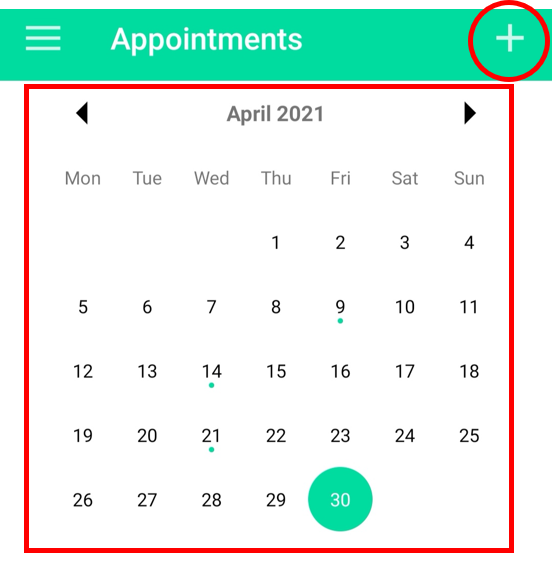
To create and set appointments for a lead or leads, navigate to the menu sidebar by clicking the burger icon on top left corner and click "Appointments".click to expand section
Firstly, click the “+” icon at top right to start creating an appointment. Also, a monthly calendar is displayed to show location of previously made appointments.
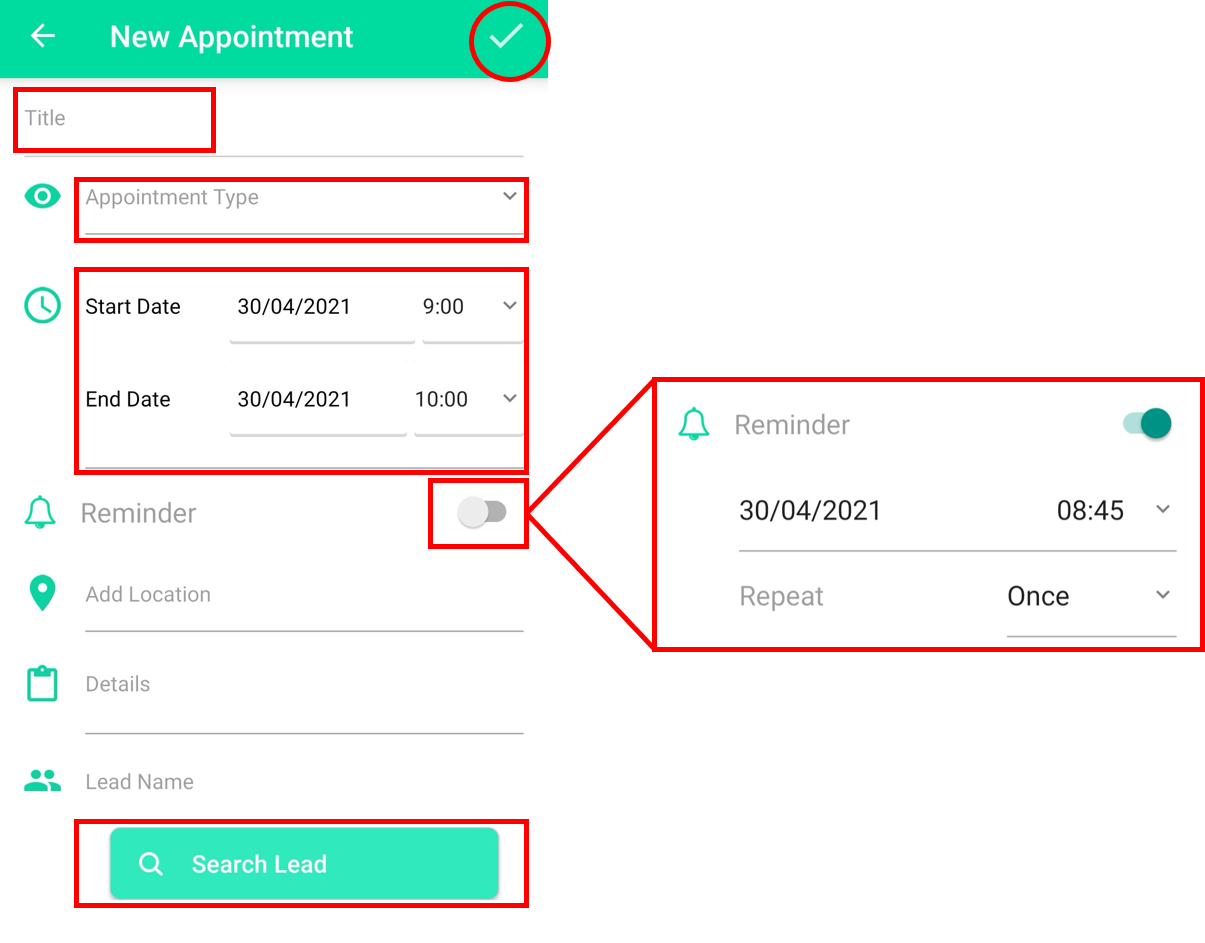
Then, fill up required information such as "Title", "Appointment Type", "Start Time", "End Time" and add leads to be involved. Reminders are optional when creating an appointment, however it is useful to prompt users when the appointment's due is getting closer. Click the "SEARCH LEAD" button to add the leads into the appointment. To confirm the target details and create the target, click the “tick” icon at top right.
Tasks
Add Tasks
To set or add tasks from the menu panel, navigate to the Add/Manage and click tasks from the "Tasks" Window.click to expand section
Both pending and completed tasks can be seen once entering the "Create New Task" page. Some details of the task that can be added involve the Task Summary, The Due Date as well as the Task Reminder in order to notify ahead of the schedule. New Lead can be searched to add to the task when accessing this window from the menu. To edit the existing task, click the Pencil Icon at the top right corner to edit the task details. If need to delete the Task data click the "Delete Task" Button.

Filter Tasks
To filter a task or tasks, navigate to the menu sidebar by clicking the burger icon on the top left corner and click "Tasks".click to expand section
Then, click the "filter" icon at the top right corner to set filter settings. When filter settings are finalized, click the "APPLY" button to confirm it. When clicked, a new list of tasks is created based on the filter settings set.

Edit & Delete Tasks
To edit a task's information or delete the task, navigate to the menu sidebar by clicking the burger icon on the top left corner and click "Leads".click to expand section
Then, select the desired task and the task page appears. At the top right, click the "Pencil" icon to start editing. After editing on the task is done, click the "tick" icon on the top right to confirm the changes. To delete the task, click the “pencil” icon, scroll down the editing page until the bottom and click “Delete Task”.

Deals
Add New Deals
To add the deals from the menu panel, navigate through the menu panel and click the "Deals" Tab.click to expand section
Tap on "Deals" from the menu panel and all of the deals can be viewed under the "Deals" tab including the deals that have been added previously. Tap the "+" icon to add a new deal and fill in the required details including the "VALUE" of the deal as well as a customer. Deals can ONLY be added to customers that have been classified as "WON"

Edit & Delete Deals
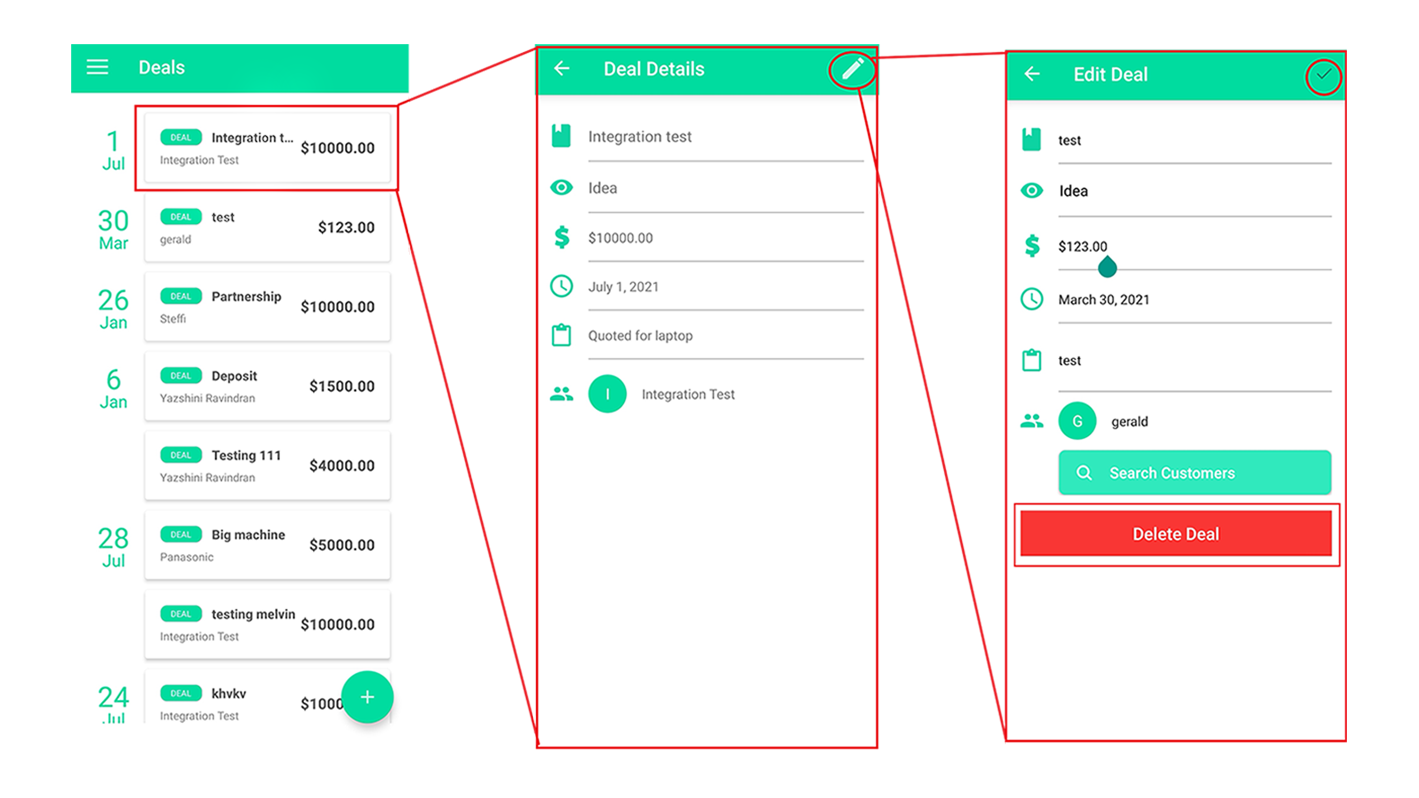
To edit a Deals's information or delete the Deal, navigate to the menu sidebar by clicking the burger icon on the top left corner and click "Deals".click to expand section
Then, select the desired deal and the deals page appears. At the top right, click the "Pencil" icon to start editing. After editing on the deal is done, click the "tick" icon on the top right to confirm the changes. To delete the deal, click the “pencil” icon, scroll down the editing page until the bottom and click “Delete Deal".
Settings
Settings
To view the frequently used settings, navigate to the menu sidebar and click settingsclick to expand section
Upon clicking the settings tab, the user will be redirected to the setting's page where they can set the settings for general accounts, integrations as well as settings for the phone. Top Up for Internet Call and SMS credits are also available by contacting the Quickdesk Tech support.

